


Adobe XD Tutorial: Basic Prototype Interactions
Learn how to create interactive prototypes in Adobe XD using wires and the tap and time trigger, with Ethan Parry
One of the great benefits of using Adobe XD is that it does more than simply let you design artboards. With the capability to create prototypes that you can share with developers, the program allows you to test out and further explore your ideas, which results in a richer end-product.
For service designer and UX research consultant Ethan Parry (@ethanparry), prototyping is a crucial part of his process. By allowing designers to solicit feedback from others and test their hypotheses about user behavior, prototypes can help UX designers and businesses reduce investing time and resources into concepts that don’t end up serving their end goal. By giving you a new way to interact with a design, prototyping can also be an excellent method of ideating and finding new inspiration and solutions.
In this tutorial, Parry explains how to use Adobe XD to create prototypes using basic actions, simulating how users will navigate and experience the design.

How to Create Basic Prototype Interactions in Adobe XD
1. Go to the upper menu bar and select Prototype mode.

2. Select your initial artboard, and click on the small home icon that appears in the upper left corner. This will establish that artboard as your main screen.

3. Select the element on your first artboard that you would like to have people click to initiate an action, typically this will be a button. Once it’s selected, you’ll see a small blue arrow appear on its edge. If you click on that, an interaction will be created.

4. Drag the arrow to another artboard, the border of which will turn blue, this will create a wire. Now, when people click on the selected element on your first artboard, it will take them to this one.
5. In the Interaction menu on the right hand side of the screen, select Tap as your Trigger, set Transition as your Action, and check that the Destination is the correct artboard.
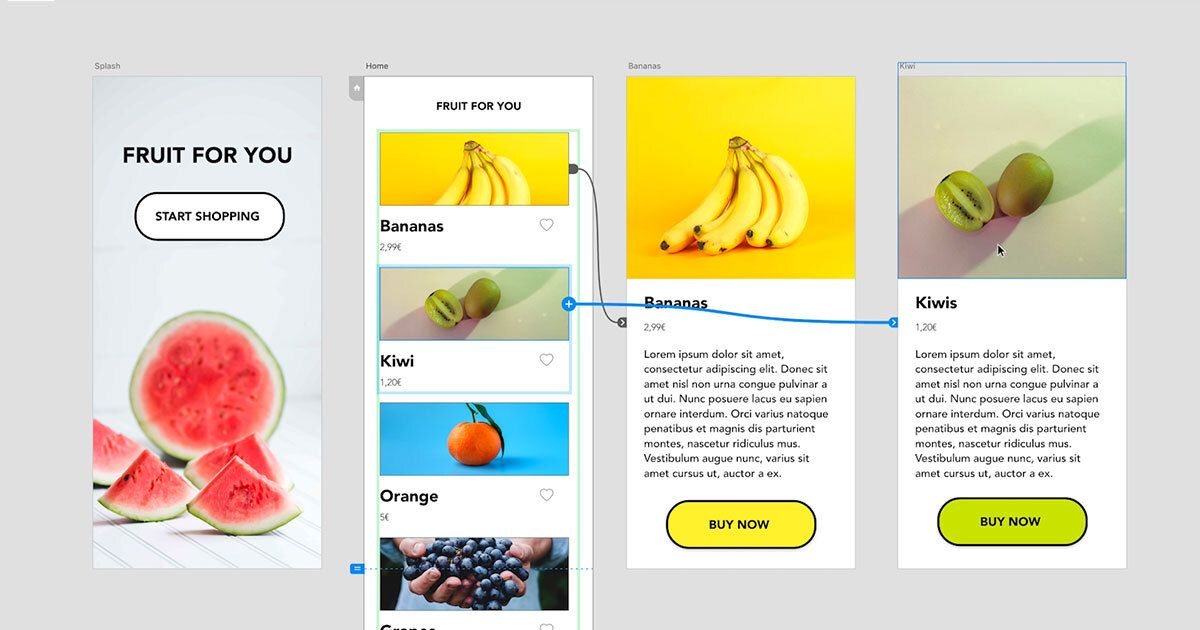
6. You can continue to repeat this process across more elements that lead to different artboards. Adobe XD will remember your interaction settings, so you won’t need to manually adjust them each time. This is especially helpful when you have to create many interactions on the same page, for instance an ecommerce with multiple products. You can select a content block, or a single image, and then drag the wire to the artboard of the corresponding product. This can then be repeated for the rest of the content blocks.

7. Another important interaction to include is a back button. To do that, go to Design mode in the upper menu bar. Then, add a back button or symbol to your artboard.
8. Return to Prototype mode, and click on the back button. A small blue arrow will appear on its edge, which you can use to drag a wire to the artboard you’d like the button to return to. Another solution would be to click the arrow, go to the Interaction menu, and under Action select Previous Artboard.

9. To delete an interaction, simply select it and press backspace on your keyboard.
10. If you’d like to create a timed interaction where users are taken to a different page without having to complete any action, select the entire artboard and press + in the Interaction menu. Then select Time as your Trigger and choose the desired delay.

11. Go to preview in the upper right corner of the screen to test your interactions and see if your prototype is working as desired, then make adjustments accordingly.
If you want to learn more about how to use Adobe XD to design and prototype UX designs, check out Ethan Parry’s online course, Introduction to Adobe XD.
You May Also Be Interested In:
- Introduction to UX Design, a course by Ethan Parry
- Brand Strategy for Online Platforms, a course by James Eccleston


0 comments