


@harry_davies
How To Make Your Own Snapchat Filter
Download Domestika's Snapchat filter and discover how to create a filter from scratch with Lens Studio and the advice of designer Pau Jimenez
Halfway through her architecture degree, Spanish designer Pau Jiménez realized that she was fascinated by the world of virtual design. That was the beginning of her career creating artistic filters for social networks such as Instagram or Snapchat, a self-taught path that has earned her her place among Snapchat's Official Lens Creators, an international group of outstanding filter creators.
We asked her if she would like to pay tribute to Domestika in her own way, by creating a custom filter for Snapchat. Pau agreed and shared with us all the necessary steps to build a filter in Lens Studio.
In this article, she will guide you through step by step, so that you can create your own custom Snapchat filter from scratch. Although, with practice, it's a skill within everyone's reach, being able to operate 3D or 2D element creation programs is essential, since that is what we’ll be using to create the materials with which we'll later build the filter in Lens Studio.

1. Download Lens Studio
There are two main types of software that we can use to create our social network filters: Lens Studio (for Snapchat) and Spark AR (for Facebook and Instagram). Pau Jiménez advises us to use Lens Studio since Spark AR is still in beta phase, which limits access and prevents making the filters public for everyone.
Lens Studio can be downloaded from its official website. Install it and you can get started on your filters.
2. Model the elements you want to include in your filter
Lens Studio's interface allows you to import elements created in 3D design programs (such as Cinema 4D or Blender) as well as those designed in other 2D image editing programs, such as Photoshop. To create our filter, we will need to have designed all the elements we want to build it with beforehand.
In the case of the Domestika filter, Pau modeled its details in Cinema 4D, using a face mesh as a base to know where to place them, and exported the project in Wavefront format (FBX is also valid) to be able to import it into Lens Studio.

3. Create your new project in Lens Studio
When you start the program, you will see that the 'NEW PROJECT' and 'OPEN PROJECT' options are visible on the left. We will go to the first one to start working on our new filter.
On the right side of the program's start screen, you will find different templates that will allow you to create customized filters for various situations more quickly, although with less freedom to customize.

4. 'Objects' tab
The 'Objects' tab (top left) contains all the elements and components for the filter. To add them, go to the 'Add New' button, where you will be able to find everything that Lens Studio offers when building a filter. In this case, Pau used three elements:
Head Binding: this component is used to link 2D or 3D objects to the user's face or to certain parts of it, following the movement that the user makes.
Eye Color: used to modify the color of the eyes. A number of color or texture fusion options are available.
Face Mask: this effect maps a 2D texture on the face. It looks like a painting on skin.

5. Add 3D or 2D objects using 'Head Binding
Inside 'Head Binding', we will be able to introduce the 2D or 3D objects that will be connected to the user's head. Once introduced, they can be dragged from the lower panel of 'Resources' and will automatically appear in the scene.
From the 'Transform' tab on the right of the interface, or via the controllers, you can rotate, move or scale the 3D or 2D objects until they are in the right place. We will have to associate a material to each element in the tab 'Mesh Visual', just below 'Transform', which will be configured according to the texture or desired effect.

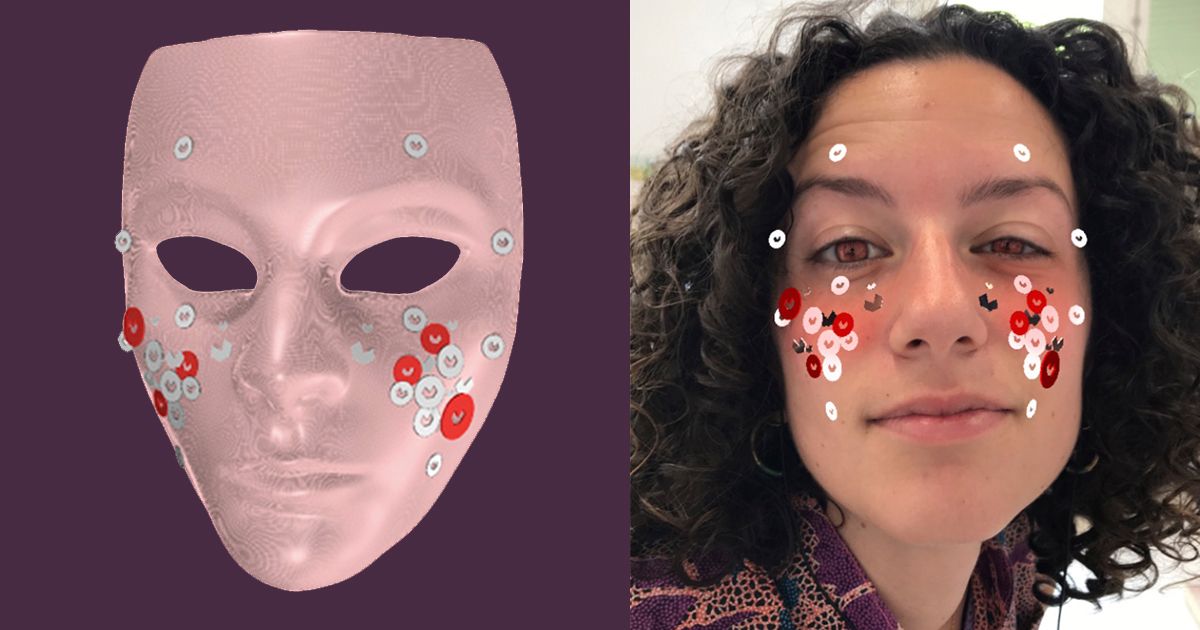
6. Add 'Face Mask'.
With 'Face Mask', we can introduce a texture on the face to give the appearance of painting or makeup. To do this, using a photographic editing program (such as Adobe Photoshop), we create a transparent background image with the desired colors on the areas that will be painted, using a real face as a base, we export it in a format that allows the transparent background, such as PNG (.png), and we introduce it from the panel 'Resources'.
The 'Face Mask' component adds the image to the texture and with the 'Blend Mode' and 'Alpha' options we can edit the way they merge, giving the texture the finish we want.

7. Export and share your filter
In the upper left part of the Lens Studio interface, we can see if our filter has the right measurements to be uploaded. Assuming they’re correct, we only have to click on 'Publish Lens' for the filter to be uploaded to our Snapchat account.
Once published, we will have two options to share it: through a direct link or using the filter QR image generated by Snapchat, which anyone with the app can scan to download it instantly.
Below, you can find the image to download Snapchat's Domestika filter. Just scan it from your Snapchat, and you can use it immediately.

Share your photo with the filter in your Instagram Stories and tag @domestika, and you’ll be entered into a draw to win a free Domestika course! You have until 04/08 to participate.
You may also be interested in:
- What is Digital Marketing?
- 5 Tips to Succeed on Instagram in 2020


1 comment
neerajsharma9523
Do you share such face filters for app development like for flutter. If yes than please do let me know how much the pricing of those face filters.