


@harry_davies
3 Creative Retouching Techniques to Work Magic on Your Photos
Create alternate realities with three simple creative retouching techniques in Photoshop that will transform your photos.
Silvia Grav (@silviagrav) began making waves in international photography from a young age: this self-taught photographer has collaborated with brands like HBO, Lexus and Samsung, inspired the makers of the opening sequence of True Detective and has impacted half the world with her fascinating photographs.
Her process begins behind the camera – and she is often the one who poses in front of it too – but a good part of the magic is made in post production, with different professional creative retouching techniques such as reshaping the image, painting with light, and blending images to create dreamlike visions that affect the viewer.
Discover these three creative retouching techniques to transform your photos:

Blend elements
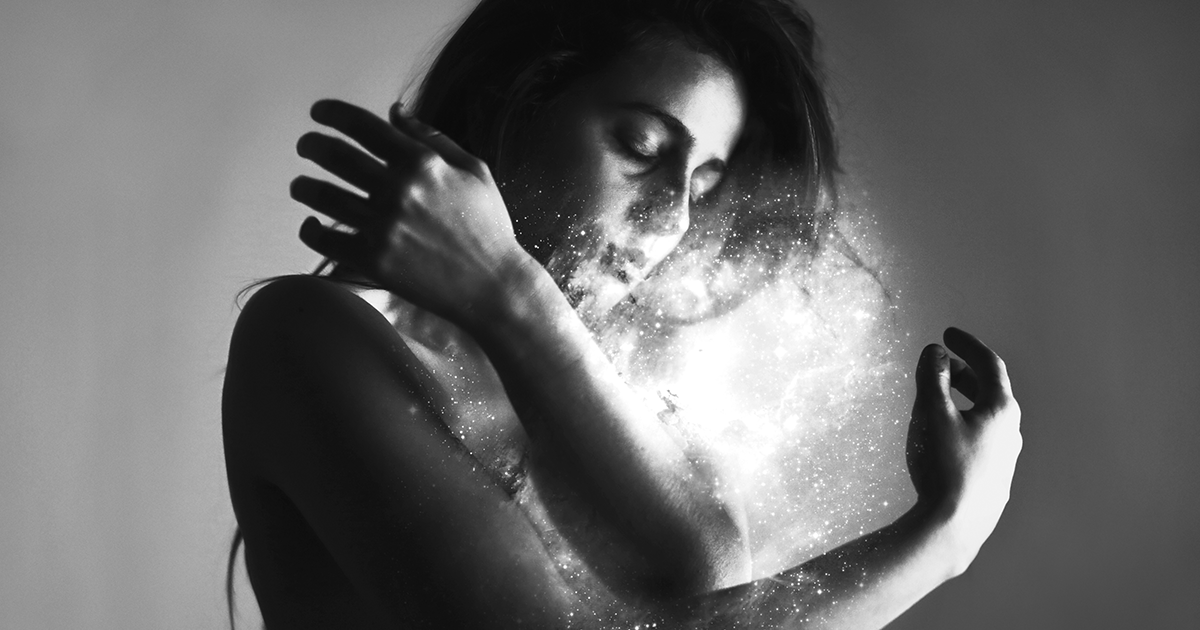
The simplest trick of them all. It consists of superimposing an external element over the photo to achieve a blended sensation.
To start, the photo should be in black and white. You can add a curve layer to improve the contrast and greys, and a transparent layer that will help you play with the brush you prefer. In this case, the idea is that the model is shot through by a light beam, so Silvia Grav used an effect that simulates galaxies.
To better achieve the effect, one has to play with the intensity and focus, this will create better cohesion between the images.

Mold
Mold the element to transform it into something new, drawing and blurring the parts which you want to dissolve.
Start with a black and white photo, add the texture you want, with soft light, and a curve mask edited to your taste.
On a new layer, experiment with a brush of your choice, only using grey tones, black and white, playing with the opacity, contrast and form. The key to this technique is adding and removing so the image gives a feeling of change until you achieve the desired effect.

Paint with light
This is one of the most useful techniques, especially if we can’t control the light when we take the photo, as is the case with street photography.
Start by adding a black and white layer to the photo, then place another layer of curves to improve the contrast.
With this technique, you darken the picture, adding scanner textures from analog photos, making use of the dust and stains that give them a certain quality. Apply soft light and, on a new layer, use the predetermined brush with a diffused border and paint in white, take care with the opacity to make sure these new lights blend with the original image.
You can also paint darkness using the color black to maintain a coherent light. You can also play with the focus to give it a more interesting aesthetic with the light.

If you want to learn more basic retouching processes that work together to create magical results, Silvia Grav’s course Photographic Post-Production for Imagination is a great option. You will learn to work with sharp contrasts between light and shade, how to use smoke in images, and how to combine elements of nature with portraits, among other things.
You may also be interested in:
- Dos and Don’ts for Writing Children’s Books
- How to Create Basic Patterns in Photoshop
- 7 Habits of Effective Artists


1 comment
Perhaps it will be useful to someone.
Find below a new free, and useful Photoshop plug-in for photo retouching:
https://freeretouch.com
It comes with a free retouching video course.