Best seller

Watercolor Portraits: Capture a Model's Personality

Course final project

A course by Michele Bajona , Contemporary Figurative Artist

Contemporary Figurative Artist. Mexico City, Mexico.
Joined July 2020
Best seller
99% positive reviews (329)
8,261 students
Audio: English
English · Spanish · Portuguese · German · French · Italian · Polish · Dutch

About the final project for: Watercolor Portraits: Capture a Model's Personality

Watercolor Portraits: Capture a Model's Personality

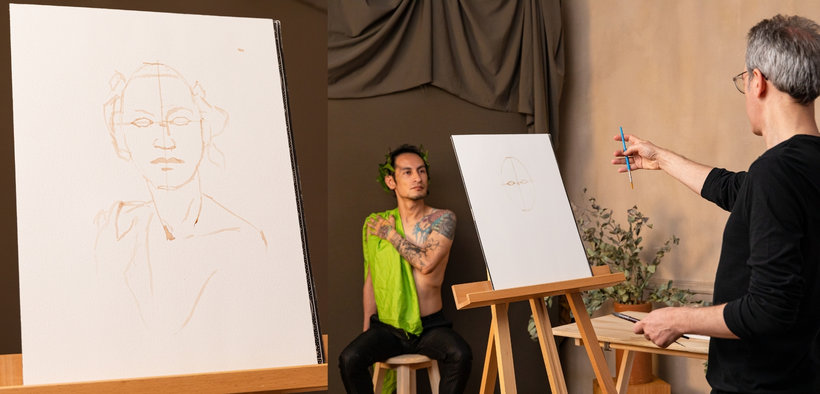
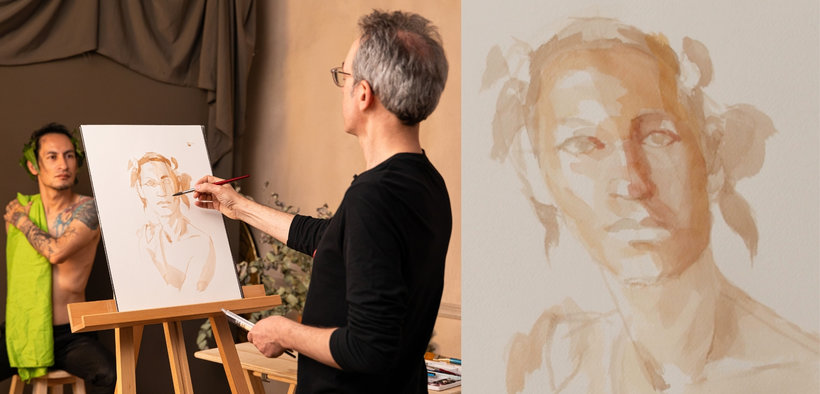
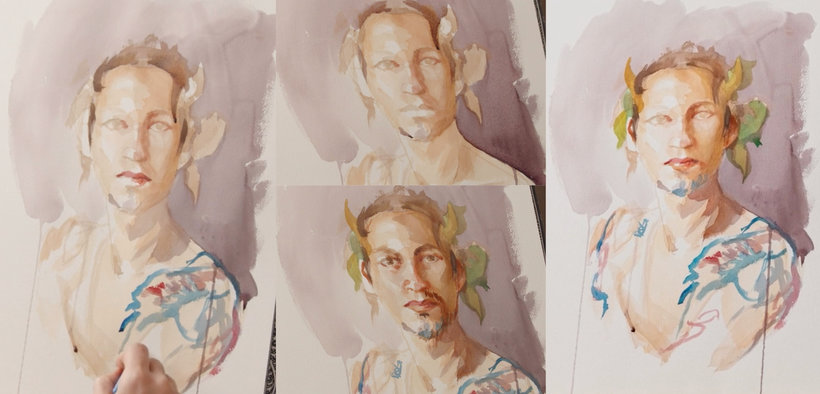
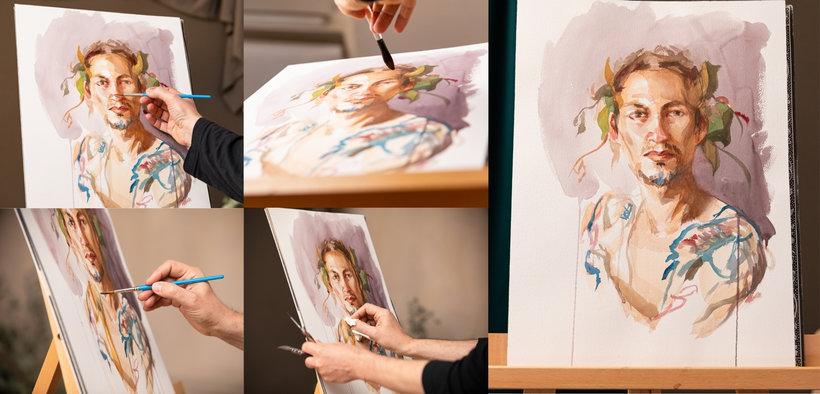
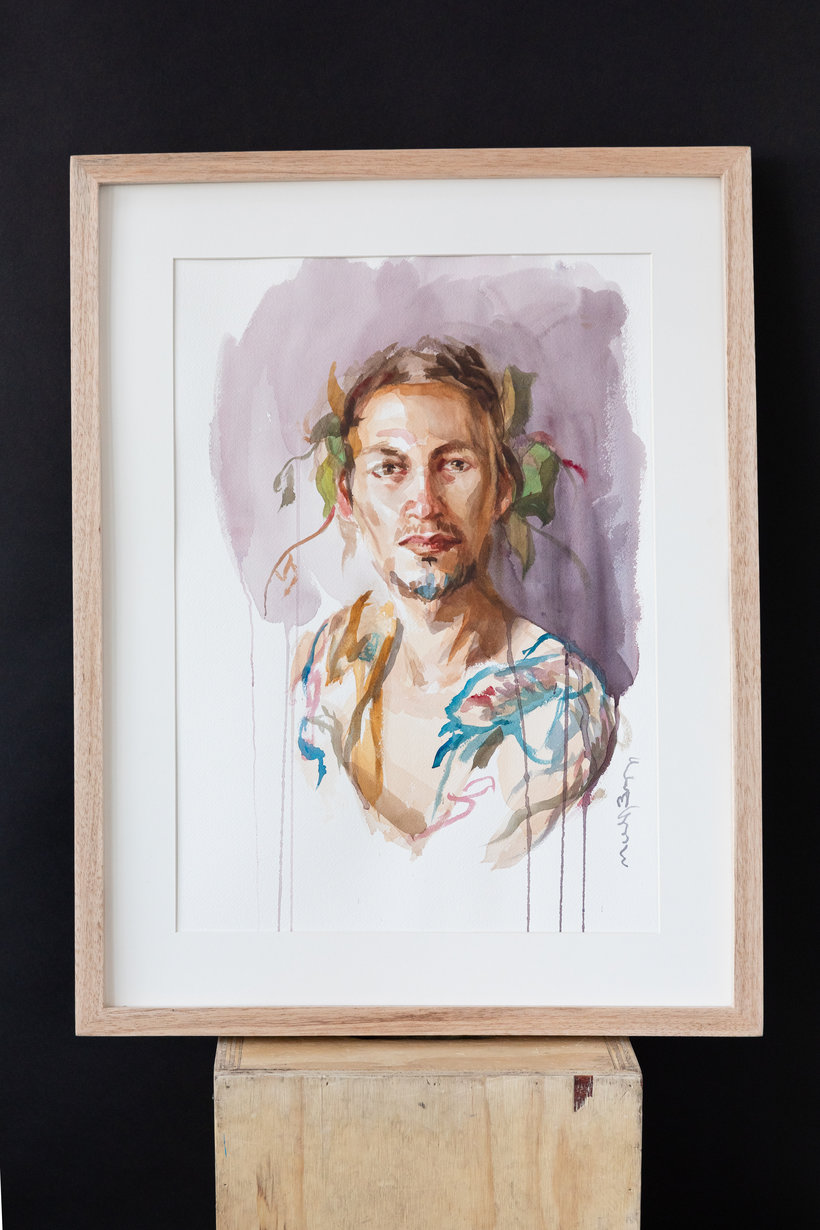
“You have reached the final of the course, thank you for being part of it! It has been a pleasure for me to be your teacher and being part of your learning process. In this Domestika course I decided to show a final project with a real person, avoiding the use of a photo reference. I think that will help you to reach the goal of a truly successful portrait painting, which is to capture the personality of the sitter. There is nothing wrong with working with photo references, but as a learning process I highly recommend you to work with a model. Before you start your own project, here is one last tip for you. When painting a portrait I like to interact with the model in a relaxed way so I try to create a comfortable setting. Offer your sitter a cup of tea, start a conversation and find a pose that you think is going to work for the model as well. Always consider that you will be working on the portrait for about two to three hours with a pause every twenty minutes. Now, it is time for you to go get your materials and start your own final project! Let me show you how I would love to see your process. The Model Look for a model, you can ask a friend or relative as your model in order to fully understand the process. Depending on the painting medium that I use, when I make a portrait sometimes I need to take pictures of the pose in order to work on it when the model is not present, that’s when I realize what a plus is to work with a real sitter!

Think about Everything before Starting to Paint Find the proper lighting, I suggest one light source to begin with, natural light is preferred but make sure that your light source doesn’t change dramatically with time (a north facing window is ideal). Try to create some contrast between light and shadow to ease your work of finding the planes of the head, I recommend this for your first portraits. Add some details to the background or the sitter that can describe a little more the personality of your model, I suggest a plain background to begin with, avoid too much visual noise as it might affect your composition.
Start Drawing Place your elements on paper and make sure you leave space above the head and always leave space in the area where the subject is looking. Draw these first construction lines with the same medium of the painting, in this case use watercolor in a light tone value with a liner or a thin brush. If you are tempted to use a pencil think that this method I suggest will be a winning solution in the long run! With a light tone, in monochrome, find the main diagonals and axes to capture torsions and alignments, then check the main proportions also taking in consideration the ideal proportions of the head as a reference. Check measurements twice, especially the length of the nose and be very careful about placing the eyes in the correct position, especially when painting a portrait in a ¾ position. Keep the drawing simple with only a few lines as a reference for the painting process.
After Drawing Once your drawing is done, then apply a light wash over all the areas that are in shadow. If you find it difficult to separate lights from shadows, try to squeeze your eyes, when in doubt it’s probably a shadow area! Never trust your first drawing, we are not just filling in the areas that we created with lines, we are actually redrawing with washes, you are building up the main forms using a big brush and a light tonal value in monochrome. Remember that you are only working on your dark areas. Don't paint anything in the light areas and preserve the white of the paper for later. Add some more light tone washes to refine features and check edges. I always try to find the edges between light and shadow and then consider if an edge is hard or soft. Using a big brush doesn’t let you enter into any detail and you can't focus on the main shapes and planes of the head.
The Midtones Add midtones washes with color going over all dark areas. Also add color defining features and decoration. Remember, practice is the best way to learn. Keep in mind you should always go from light tones to dark tones in order: light, medium and dark. I’m always saying to myself, how lighter or how darker is an element in comparison to another. Don’t forget to check proportions and features location once more.
Details Really Matter! Go for a second time over the main features: eyes, nose, mouth and ears. If possible add a background, that would be essential to define hair. You can bring some of the background color into your portrait and reference it when you detail clothed areas and decorative elements if there are any. Don’t rush yourself, you need to think about which background would be the best, it’s important to pick the right tonal value and color based on composition. Last but not least! Work on dark tonal values with color; “we work our darkest darks following the concept of working our dark areas first in order to find the light”, which is actually a great metaphor for life! Finish by defining elements of the background and hair textures and paint details and textures of clothes and decorations.
So that's it! You are ready to frame your painting! Now that you have such an amazing and beautiful portrait, before we say goodbye, and because I really enjoy sharing everything I know with you, here is another tip: what I like to do when I’m done with a portrait is to turn it upside down, this way I can see proportions much better and I can make sure there are no errors in the proportions or the location of the main features, I check alignments, smaller measurements and so on. A common mistake is to paint a nose that is longer than reality and that’s a factor that can jeopardize our likeness for just a few millimeters. I also check the mouth because it’s a feature that can add a lot of expression, end the revision completing the eyes in order to bring my portrait to life ‘activating’ what I have created so far! Finally, as I told you before… you don’t fight with watercolors, you flow with them! Practice, watch them, give yourself the chance to learn how to see. Please, don’t forget to share your portrait and the process. You are not going alone on this path, we are a community and you never know who can teach you new things. If the portrait didn't turn out as you expected, don’t panic, keep practicing! But never give up, mistakes can also be a great lesson. It’s time for me to say goodbye, but not without telling you once again how grateful I am for you trusting me to be your teacher. We will keep in touch! Viva l'arte! ”

Partial transcription of the video

“Final Project Dear students, we have reached the end of the course. I hope you have enjoyed the process. Together, we have discovered the magic of color and different watercolor techniques to solve any issue you might have in your final project. Wet on wet, wet on dry, color mixing, applying layers, gradient washes, and how to achieve different textures. You discovered the anatomy of the eye, and we painted one using a full color palette in order to start practicing before working on your final project: the portrait. Remember, you don't need a model in order to paint a portrait. You may do ...”

This transcript is automatically generated, so it may contain mistakes.


Course summary for: Watercolor Portraits: Capture a Model's Personality

  • Level: Beginner
  • 99% positive reviews (329)
  • 8261 students
  • 5 units
  • 17 lessons (3h 12m)
  • 11 downloads
  • Category

    Illustration
  • Areas

    Fine Arts, Painting, Portrait Drawing, Watercolor Painting

Michele Bajona

Michele Bajona
A course by Michele Bajona

Teacher Plus
Contemporary Figurative Artist

Michele Bajona is an architect-turned-painter whose artwork has been exhibited throughout America and Europe. He attended the Art Student League in New York City and is a member of Cercle Artístic de Sant Lluc in Barcelona. He currently resides in Mexico City, where he continues to paint and teaches art. He has given masterclasses at Museums and cultural institutions.

In addition to solo and collective exhibitions across the globe, he won the first prize for best video documentary at the 54th Venice Art Biennial, Padiglione Italia.


  • 99% positive reviews (329)
  • 8,261 students
  • 17 lessons (3h 12m)
  • 25 additional resources (11 files)
  • Online and at your own pace
  • Available on the app
  • Audio: English
  • English · Spanish · Portuguese · German · French · Italian · Polish · Dutch
  • Level: Beginner
  • Unlimited access forever

Category
Areas
Watercolor Portraits: Capture a Model's Personality. Illustration course by Michele Bajona Best seller

Watercolor Portraits: Capture a Model's Personality

A course by Michele Bajona
Contemporary Figurative Artist. Mexico City, Mexico.
Joined July 2020
  • 99% positive reviews (329)
  • 8,261 students