


Procreate Tutorial: How to Design a Festive Greeting Card

Learn the steps to design a festive greeting card on Procreate with illustrator Lauren Radley
The holiday season is around the corner, and what better way to send a loved one some festive wishes and practice your skills on Procreate in the process than by designing your very own festive greeting card?
Lauren Radley has over ten years’ experience as an illustrator and has worked with some amazing clients including The Telegraph, BBC Publishing, Coffee Republic, and The National Trust. She now runs her very own business creating fun and whimsical prints, stationery, and other beautiful illustrated products.
Join her in this tutorial as she takes you through the steps to design a unique greeting card featuring a beautiful wreath. This is a much more personal and thoughtful way to wish your friends and family a happy holiday season, and once you have mastered your design, you can print as many cards as you like.
Lauren will begin by sketching out her design by hand, before transferring the image to Procreate on her iPad and coloring it in digitally.
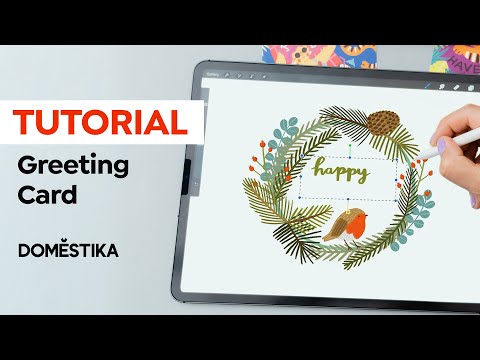
How to Design a Festive Greeting Card
1. Sketch out your design
Lauren opts for a traditional wreath design with leaves and foliage. She begins by sketching out her basic design by hand. This doesn’t have to be a perfect drawing as no one else will see it, but it will help give you an idea of the basic composition when you transfer it to Procreate.

2. Digitally import your sketch
This step is also very simple - just take a photo of your sketch using your iPad and then open the file using Procreate to continue developing your design.

3. Refine your sketch
Create a new layer on Procreate above your imported sketch and pick a pen that you are comfortable using (Lauren selects the technical pen). Now you can start drawing over your imported sketch to refine and polish the design.
4. Block in base colors
Reduce the opacity of your sketch layer and create a new layer on top. Lauren has created a festive-inspired color palette of greens, browns and reds which she then uses to begin coloring in and blocking out the base colors of her design on this new layer.

5. Add your detail
Now that you’ve got your main design, it’s time to start adding some detail. Lauren creates a clipping mask from the layer options menu and uses a textured brush to add some brushstrokes and little details that will bring her illustration to life. Don’t forget to hide the original sketch underneath now that you have your design completed over the top.

6. Add your text
Lauren chooses a darker green color for her text that will stand out from the rest of her design and chooses a brush from the “calligraphy” options on Procreate. Practice makes perfect, so don’t worry if you have to try writing your text several times to get it looking just right. Using “move tool,” she drags the text into the center of her design and resizes it so that it fits nicely inside the wreath.
Your design is now ready to print as a greeting card!
If you enjoyed this tutorial and would like to know more about how to create colorful greeting cards and learn how to sell them online, check out Lauren’s upcoming Domestika course “Greeting Card Design: Illustrate and Sell Your Collection."
You may also like:
- Procreate Tutorial: How to Create Lettering Textures and Brushes
- Procreate Tutorial: Basic Actions for Working on an iPad
- Creating an Illustrated Brand: From the Idea to Merchandising, course by Vania Bachur
- Vector Illustration for Stationery, course by Camipepe


1 comment
Good basic information. Production is another matter. How are your cards printed? As my printer cannot print out past to the edges of the paper, the printed image has to be cut so the image extends to fill the entire page. How do you print your cards?