


Procreate Tutorial: Basic Actions for Working on an iPad

Learn from Samuel Rodriguez the basic actions needed to make a creative illustration using the Procreate app
Over the past few years, the Procreate app has quickly become popular with illustrators and visual artists, thanks to its low price, large suite of tools, and often intuitive controls.
Combining some traditional interface elements with iPad-enabled features, like hand gesture shortcuts, the app makes it easy to begin illustrating without having to deal with a major software learning curve.
In this tutorial, illustrator Samuel Rodriguez (@samrodriguezart) shares the basics for how to get started with Procreate, demonstrating how to set up a new document, manipulate layers, and use time-saving shortcuts.
Creating a new document in Procreate
1. In the upper right corner of the screen, select the + symbol. Then, in the upper right corner of the menu that appears, hit the + symbol in the new menu that appears. This will take you to the page where you can select your canvas’ size and properties.

2. The canvas size you select will depend on what you plan to do with your final image. Choose the unit of measurement you would like to use, and input the size. Since Rodriguez creates prints of his work, he sets his canvas to the print size he uses (8.5 by 11 inches).
3. Another important setting at this stage is your DPI, which is the resolution of your image. Most images online are between 72 and 150 DPI, since anything larger would use more data and result in them loading very slowly. If you want to print your image, it’s good to have at least 300 DPI, and for larger print formats you’ll need an even higher resolution. It’s good to remember that you can always convert your file to a lower resolution if needed, so if you’re unsure about eventually printing your illustration, it’s recommended to work at 300 DPI.

4. Once you’ve got the settings you’d like, hit “Create” in the upper right corner to open your new document.
Using brushes and layers in Procreate
1. In the bar at the top of your screen, select the brush icon to see your preloaded brush options. You can also create folders in this menu, which Rodriguez has done so that he can quickly access his favorite brushes. In his own work, he only uses two brushes: a hard airbrush for super clean lines, and bonobo chalk for shading and texture.

2. To change the color, select the circle icon in the foremost right hand corner of the screen. To adjust the brush size, use the bar on the left side of the screen.
3. Select the mouse icon on the left side up the upper bar to select and move elements around your canvas.
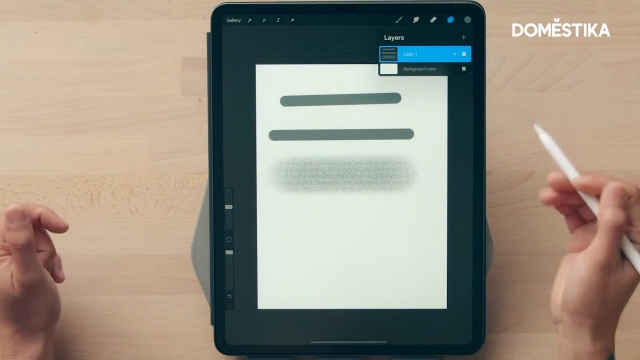
4. In the upper right corner, select the icon that looks like two overlapping squares to open the layers menu. Swipe a layer to the left for options to appear. This will give you the option to easily delete, duplicate, or lock your layer.

5. To merge layers, click and hold on the layer until a list of options appears. Click “Merge Down” for the layer to merge with the one below it. Hold down on a layer to drag and reorganize its location in the menu.
Using shortcuts in Procreate
1. If you want to create a perfectly straight line, simply draw a line and hold down the end for Procreate to automatically adjust it.

2. If you want to create a perfectly rounded shape, do the same, drawing the shape and holding down the edge. Then drag your stylus to adjust the shape, making it more circular or ovular depending on your preference.

3. If you want to undo any action, simply double tap on the screen.
4. To easily autofill a shape, click on the color icon in the upper right corner and drag it to your shape. This only works for solid shapes that have a crisp line, if you are using a textured brush this action will instead autofill the background of your canvas.
5. If you’d like to test out different colors in your composition, duplicate your layer, add color, and then in the layers menu you can hide or show it.

Did you enjoy this tutorial? If you’d like to learn more about how to combine lettering and abstract elements in your portrait illustrations using Procreate, check out Samuel Rodriguez's online course, Creative Portraits with Procreate.
You May Also Be Interested In:
- Introduction to Procreate, 7 courses by Román García Mora
- Female Character Portraits in Procreate, a course by Natália Dias
- Illustrated Portraits with Procreate, a course by Elena Garnu


0 comments