


Cinema 4D Tutorial: How to Animate Letters Simply
Learn a technique to animate letters using a motion capture from Mixamo bookstore with Holke
Animating typography is a very useful resource for your experimental animation works. The possibilities are infinite and you can create very fun, interesting results
In this tutorial, motion designer Holke 79 (@holke79) teaches us a quick and simple way to animate words or phrases in Cinema 4D, using the gallery of resources found at mixamo.com. You can find it here:

1. Choose a character and an animation
The first step after having created the text that you want to animate in Cinema 4D will be to visit the website mixamo.com with your Adobe Creative Cloud Account.
Once you’re there, you’ll be able to choose between multiple characters and animations, which are motion captures created with sensors for realistic and interesting results.
For this type of animation it will be ideal to choose an exaggerated movement for the text so that the text we want to move can be seen in the best possible way. Once you’ve chosen it, click the download button and make sure you download in the .fbx format at, for example, 30 frames per second.

2. Import the file to Cinema 4D
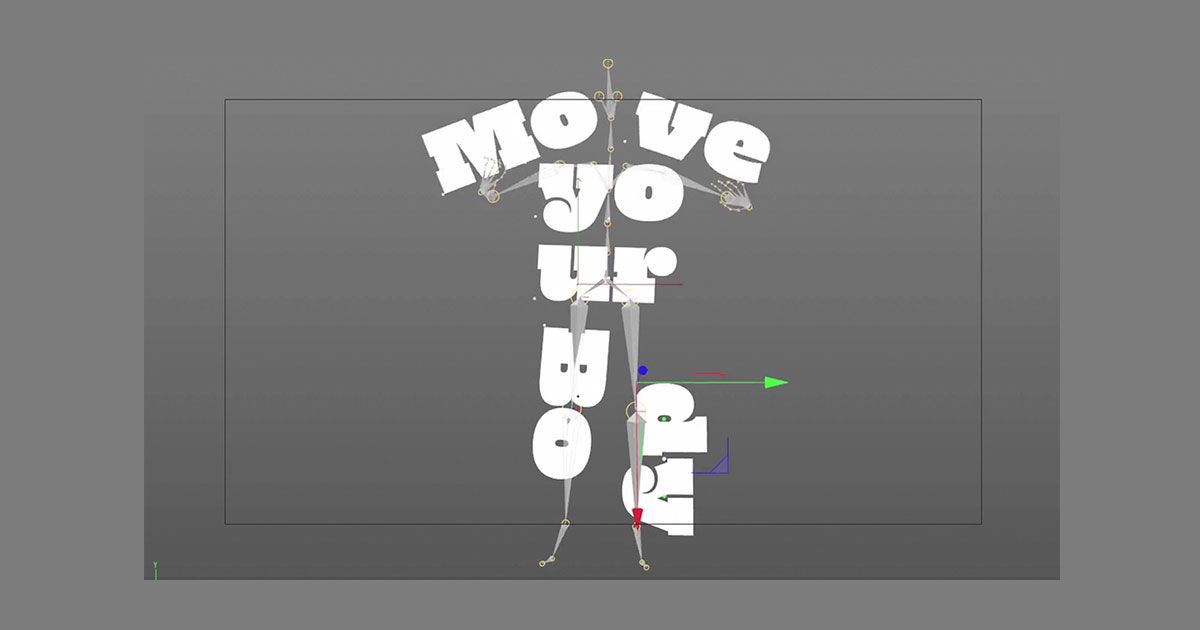
Open your downloaded file in Cinema 4D. There you can see the characters layers: you need the ‘bones’ one. Copy the bones system from the .fbx archive and paste it using Control + V into the scene where you have the text you want to animate.
Once everything is in the same scene, uncheck everything that is selected and create a null with Alt and G in which to place the system of bones. Use the controller to change the position of the axis and rescale it so it fits with the size and placement of the text.

3. Join every text to a bone
Once you have the text and the skeleton in the same scene, separate the phrase into different words or syllables so you can link each one to a different part of the skeleton.
At this point, identify which part you want to link to which word and convert the text to the ‘son’ of the bone. Once it has been transformed, the text will move with the bone.
Nevertheless, it’s possible that this is badly placed: to solve the problem, select the text and write into the Rotacion and Coordinates section “O” so they share the space. This will be totally stuck to the Anchor Point of the bone and you will only need to adjust its position so that the letters stay exactly where you want them to.
Repeat this process with the other parts of the text until you have distributed everything.

4. Final settings and exportation
Once our animation is ready, it is the moment to adjust sizes, angles and placement to ensure the best readability and visual rhythm possible. You can preview the result of the animation with Control + R.

When you are happy with your work, it’s time to export. You have various options: you can, for example, export your creation as a sequence of images. In this case, make sure you choose, for example, .png or .tiff, but never jpg to avoid losing the quality of the images. Another option is to import through Cineware, the tool with which After Effects creates all the Cinema 4D files.

Have you enjoyed this tutorial? If you want to learn with Holke 79 the professional techniques to animate your typographic creations with After Effects and Cinema 4D, explore the online course ‘Advanced Animation for typographic compositions.’
You may also be interested in:
- 'Animation for Typographic Compositions', a course by Holke 79.
- 'Introduction to Motion Design and Animation Curves in After Effects', a course by Holke 79.


0 comments