


Photoshop Tutorial: How to Replace The Sky in Architectural Photography

Learn the techniques of photographic postproduction to use the exposure of the sky to complement your photography with Daniel Garay Arango
The sky is one of the key elements of architectural photography. Unlike the human eye, the camera's sensor is usually incapable of capturing all the nuances of the sky, and on many occasions we will have to resort to programs like Adobe Photoshop to get everything we want out of it.
In the following tutorial, Daniel Garay Arango (@danielgarayarango), a photographer specialized in black and white architectural images, explains step by step how to edit the sky in your photographs to obtain professional and spectacular results. Find out more in the video below:
Photographing the sky
First of all, Garay suggests using a neutral density filter, attached to our camera, to get a complete sweep of the sky when we photograph it. But, of course, there will be occasions when we do not have filters and we find ourselves with complicated light situations for the building we want to photograph, having to overexpose the sky at the expense of getting more detail in the object of our photography.
Garay often resorts to tension lines, generated by the clouds, to make his photographs more dramatic. As this does not always present itself naturally in reality, the photographer takes advantage of Adobe Photoshop tools to achieve this.

Editing the sky in our photographs
1. Starting from a black and white photo, duplicate the base layer and put it on top of the other layers.

2. On this layer, select the sky, invert the selection and remove the bottom part of the layer. Hide the rest of the layers to create an image where only the sky is present.

3. Using the Lasso tool, make a selection of the transparent part under the sky, including some sky in the selection. Also leave the trees and other elements that stand out within the selection.

4. Use Shift+Backspace to access Fill, make sure the option "Select by content" and 100% opacity are selected in the dialog box and press ok. Photoshop will automatically fill the area you selected in the previous step.

5. Edit exposure, contrast and other aspects of the sky using Camera Raw. Reduce highlights and exposure, and increase contrast.

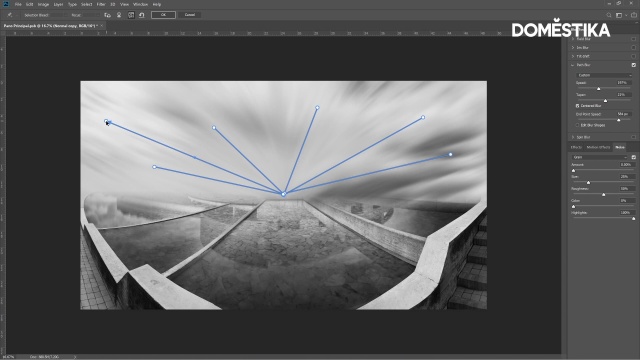
6. With the sky layer selected, go to Filters > Filter Gallery > Field Blur. Within the filter window, deselect Field Blur and choose Path Blur. Now, create lines starting from the center, where the building is located, to the outside of the photo. Play around with the available options until you get the desired effect. Finally, press ok.

7. Select the sky layer again, invert the selection and press Delete. Now, you should have the sky edited and the building above it.

8. Now, we must continue to edit the sky, taking into account how it relates to the building in terms of composition and light. Choose the sky layer and turn it into an intelligent object. Access Camera Raw with Command+Shift+A. Remember, because your layer is a smart object, changes will be stored in a separate layer that you can delete and modify independently so as not to affect the original sky.

9. Work the sky in Camera Raw. Selecting the Radial Filter, place it wherever you want and work on the rest of the components of the sky: exposure, contrast, texture, clarity. You can duplicate the Radial Filter to double the effect.

11. Keep working the sky with the same filters, until you achieve your desired effect.

If you liked this tutorial, learn how to prepare, shoot, and edit black and white photos of the spaces that surround you with a fine art aesthetic from Daniel Garay Arango on his online course Post-production Techniques for Architectural Photography.
You may also like:
- Adobe Photoshop for Photo Editing and Retouching, a course by Daniel Arranz Molinero
- Adobe Photoshop for Color Correction, a course by Manu Torres
- Introduction to Camera Raw, a course by Núria Aguadé


0 comments