Still-Life Composition in 3D

Course final project

A course by Pablo Schiavo , Designer and 3D Artist

Designer and 3D Artist. Buenos Aires, Argentina.
Joined November 2015
100% positive reviews (66)
1,175 students
Audio: Spanish
Spanish · English · Portuguese · German · French · Italian · Polish · Dutch

About the final project for: Still-Life Composition in 3D

Still-Life Composition in 3D

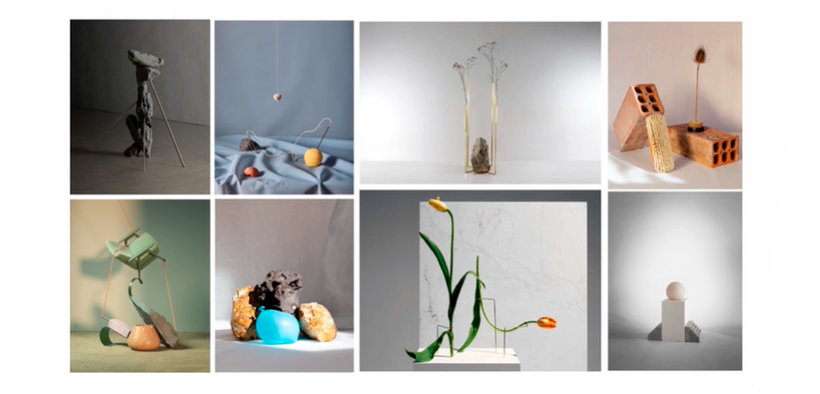
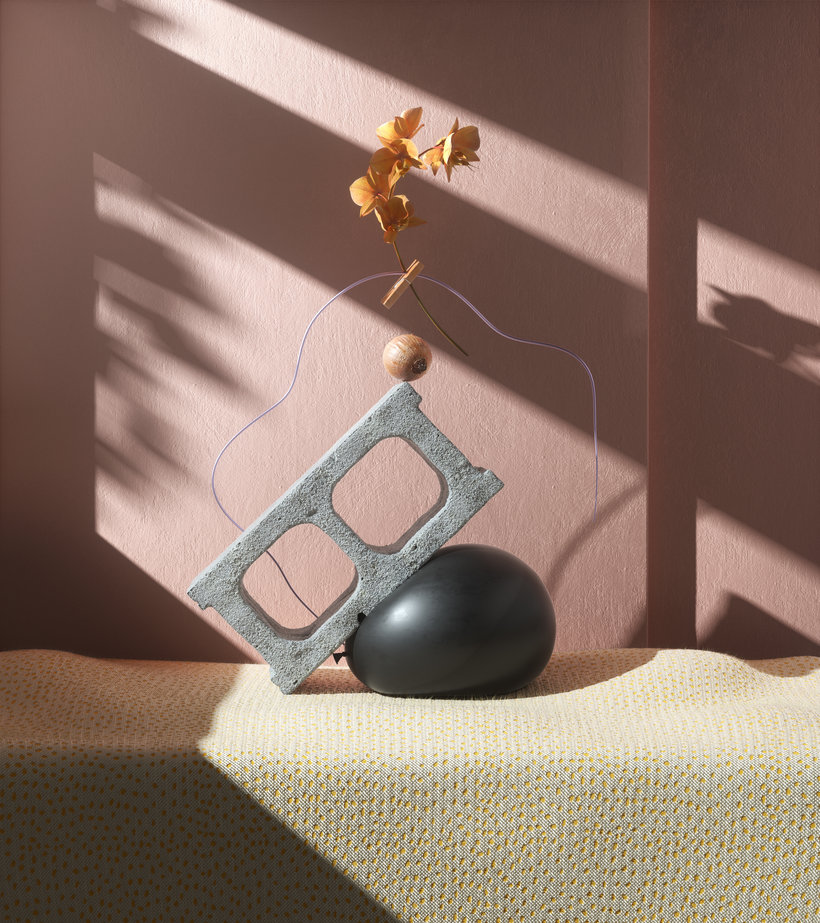
“We have reached the end of the course. I hope you have enjoyed and learned a lot throughout the different lessons. Now we are going to see the necessary steps to make the final project: Research, development and mood board (R&D) Start looking for images related to your concepts and that in some way or another can contribute to your final still life . Look for references of lighting, shapes, spaces, composition, even images that seem interesting to you and that perhaps at first glance do not contribute something specific. Do not focus only on 3D renderings, but also in the areas of architecture, photography, or traditional illustration.

When you already have a sufficient amount of images, now separate them into the categories that we saw to make the moo dboard. This will help you as a reference so that you can begin to visualize how you would like your final image to look. Composition and camera Once inside Cinema 4D, set up a camera, and only using the software's primitives (spheres, cubes, etc.) create a composition that you find interesting and that transmits a sense of balance and equilibrium to the viewer. This will allow you to have a strong and firm visual reference right from the start.
Modeling When you have a camera and composition that you find interesting, move on to modeling the objects. Practice with the basic tools modeling the objects of your composition or any simple object, so you will become familiar with the basic modeling tools. (For me an exercise that helped me in my beginnings in 3D to learn to model was to create a machine like a submarine or a time machine where I can use pretty basic modeling tools) Using the "Volume builder" tool will also help you get results quickly. Don't forget that you can use the "Fields" tool to generate details of imperfections or cracks when you deem it necessary. Also look for models on the pages that I showed you to complement your composition and speed up the times if you think it is necessary.
Lighting Next comes the lighting stage. Remember that all the lights you use have a function. Every so often you can turn them all off and turn them on one by one to see exactly what each light is doing in the image. At this stage it is important to keep in mind what result you are looking for, if you want a perfect set lighting, (as to show a product, for example) or if you want a more realistic lighting in which the observer should have information about objects and things that happen outside the scene. Use the lesson we saw of the three lights as a reference to start lighting but explore and get inspired by everyday life, lighting in movies, photos and works of art, in addition to the initial mood board.
Materials Once we have the lighting, we move on to creating materials. I recommend that you start by creating a simple material and looking for it to look as realistic as possible. Remember that in our head what makes an object look realistic are the micro-textures and imperfections. Keep it subtle, it is normal that when you learn to do something you want to show it and make it noticeable, but for something to look realistic it is important to keep the details subtle. Keep in mind the mood board, the images that we look for at the beginning are essential at this stage, both for the materials and for the color palette. Once the materials are ready, we can adjust the lighting a bit again so that the materials look their best.
Render and color composition Once you have the materials and lighting ready, you are in the final stage, but do not rush to send the render. Check all the parameters that we saw well so that the image comes out in the best way and you can give it the last touches in Photoshop. Finally, create two more cameras of the same composition to have a more complete project that you can show in your portfolio.
Now it's your turn, share your final project with all of us by clicking on "Create your project". Remember to share both the final result of your composition and the steps that have led you to it. I hope you have enjoyed the course and see you in the forum to give you feedback on your work. See you soon! ”

Partial transcription of the video

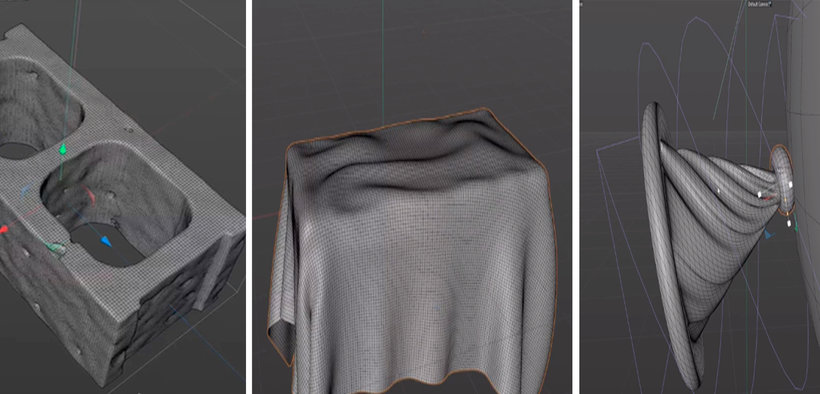
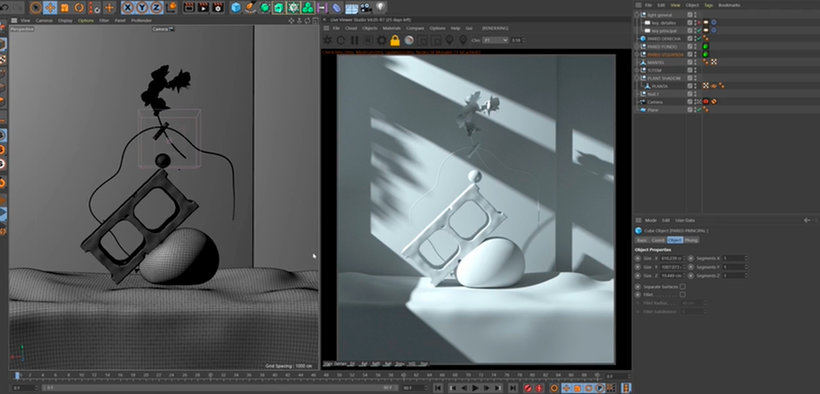
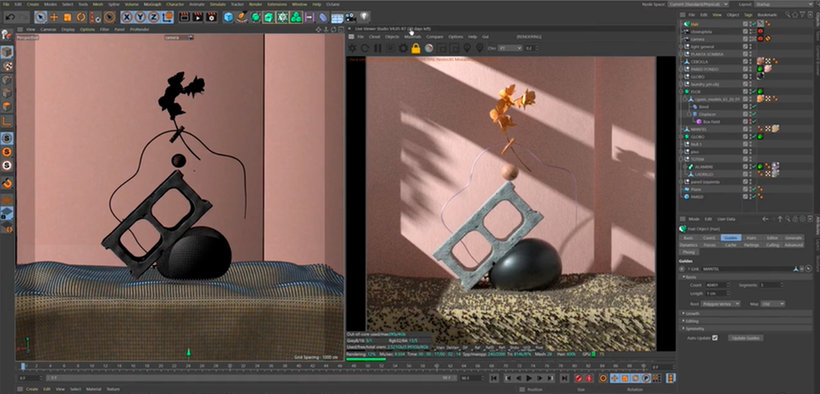
“Final project We are going to make a summary of all the contents that we saw during the course. First I told them what my influences are, the studies and the brands I worked with and we saw what we would do in the course. First we propose the realization of a "still life" with the concepts of balance and nature. Then I explained why I use Octane as the rendering engine. We start with the fundamentals of design and how to make a mood board, how to separate into categories to use as a kick in our project. Then we saw how to work with composition and camera and we start with item modeling. We ...”

This transcript is automatically generated, so it may contain mistakes.


Course summary for: Still-Life Composition in 3D

  • Level: Beginner
  • 100% positive reviews (66)
  • 1175 students
  • 4 units
  • 17 lessons (2h 38m)
  • 4 downloads
  • Category

    3D & Animation, Design
  • Software

    Adobe Photoshop, Cinema 4D, OctaneRender
  • Areas

    3D, 3D Design

Pablo Schiavo

Pablo Schiavo
A course by Pablo Schiavo

Teacher Plus
Designer and 3D Artist

Pablo Schiavo is a designer and 3D artist specialized in creating style frames. Using digital modeling, he explores how to translate complex concepts through 3D images, constantly experimenting with shapes, lighting, textures, materials, and colors.

He is also the founder of Geomancy Studio, specialized in the creation of digital experiences that explore limits between realism and imagination through 3D compositions. He has collaborated with major brands like HBO, Swatch, Bundesliga, MSI, Nickelon, TFX France, Fernet Branco, and more.


  • 100% positive reviews (66)
  • 1,175 students
  • 17 lessons (2h 38m)
  • 11 additional resources (4 files)
  • Online and at your own pace
  • Available on the app
  • Audio: Spanish
  • Spanish · English · Portuguese · German · French · Italian · Polish · Dutch
  • Level: Beginner
  • Unlimited access forever

Areas
Still-Life Composition in 3D. 3D, Animation, and Design course by Pablo Schiavo

Still-Life Composition in 3D

A course by Pablo Schiavo
Designer and 3D Artist. Buenos Aires, Argentina.
Joined November 2015
  • 100% positive reviews (66)
  • 1,175 students