


Illustration Tutorial: How to Illustrate a Character with Ink
Learn with Alejandra Acosta how to take a character from a story and illustrate them with ink
There are almost as many ways to illustrate as there are illustrators, but some illustration techniques have survived the passage of centuries thanks to their effectiveness, character, and results. Combining several of these techniques, such as ink printing, will allow us to obtain more original and unique illustrations.
In the following video tutorial, the illustrator Alejandra Acosta (@alejandraacosta) teaches us how to create illustrated characters through the process of ink printing. A very organic and simple technique that can give us surprising results. Discover it below:

Prepare your character sketches
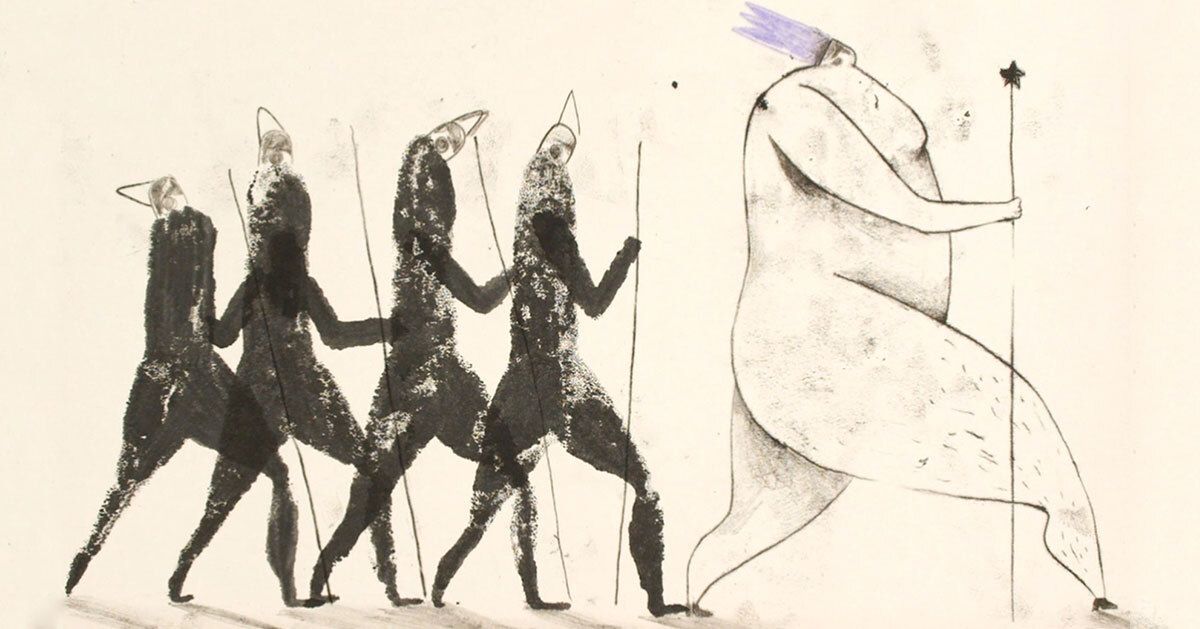
Before you start applying ink, it is essential to have sketches of the characters you will be working with. Alejandra has prepared a sketch of an emperor and one of his guards, which she will later multiply to generate several characters. In the case of the guards, Alejandra has prepared several different measures of height in the same sketch, in order to create characters of different heights.
Making the emperor
1. Alejandra starts with the emperor sketch, on a plain sheet of paper. The aim is to transfer the figure to the paper, where she will put together the whole composition of characters. To do this, she flips the sheet with the emperor and applies black ink to several points to be spread later. Try and avoid going overboard.

2. Spread the ink with a roller, so that it covers the back of the sheet on which you have the emperor's sketch. It's okay if there are imperfections: they can make the final print more interesting. When you have it, you can remove the excess pigment by placing another sheet over the ink and pressing it down gently.

3. Turn the sheet with the sketch and the ink over, placing the face with the ink upside down, on the sheet on which you are going to place the final composition. Draw the body of the emperor, going over its outlines, and lifting the sheet to see how the line is coming along.

4. You are drawing so the ink on the other part of the sheet is printed on the final composition n the areas you want to fill in. This way you can work on the shadow areas, marking all those places of the figure that you want to be printed. Do it slowly and with circular movements.

5. If there is a piece of the figure that has not been properly printed in the final composition, you can cut out a fragment of the sheet with ink and place it on the area that you need to print, drawing on the sheet once more so that the ink is transferred.

Making the guards
Start by taking the sheet with the guards sketch and turn it over, but instead of applying the ink directly, as in the case of the emperor, place a sheet of acetate and trace the sketch on it, on the reverse side of the sheet.
Pour the India ink into any small container and, on the acetate, fill the body of the character with the ink and a brush.

3. When you have it filled, turn the acetate over and press the character gently onto the final composition.

4. With the four characters already printed on the final composition, Alejandra adds some arms, also printed. To do this, she simply adds them to the acetate with ink, taking advantage of the pigment as a reference, and prints them on the final composition.
5. She adds spears to the guards. You only have to cut out a piece of leftover inked paper, mark a line with it that will represent the spear on the final composition. Use this process to add whatever details you think necessary.

Creating the emperor's crown
1. Sketch the crown on a piece of paper, and color the back with a oil pastel color of your choice, applying lots of pigment.

2. As in the previous steps, turn the paper over and place it where you want to place the crown. Trace its edges and finally draw the inside of the crown.
3. If you want to give the crown a little more volume, you can repeat the shading process by using a piece of paper with black ink.

4. Add the shadows of the characters to the sheet using pieces of paper with ink as before.

Like this tutorial? Learn more from Alejandra Acosta about making your own illustrated universe from a story using a variety of techniques on her course Graphic Experimentation for Illustrated Stories.
You may also like:
- Narrative Techniques for Illustrated Stories, a course by Paula Bossio
- Visual Storytelling with Graphite for Beginners, a course by Siamés Escalante
- Illustrated Character Design and World Creation, a course by Nathan Jurevicius


3 comments
agirlnamedkay
Stunning. Wonderfully explained. Thank you. :)
sammm
Veeery interesting, inspiring and funny! Oh, and your artwork is stunning... Thank you so much, Alejandra :)
mehrnaztorkaman
I really enjoyed it <3