


Craft Tutorial: How to Prepare Your Frame to Start Embroidering
Basic tips when starting to embroider using a hoop, by Gimena Romero
The frame or hoop is one of the main elements in needlework, and it's important to talk about it and its role in the embroidery creative process. Gimena Romero (@gimenaromero), the textile artist specialised in illustrating through needlework, gives you the keys to prepare your frame before you start your embroidery and tells you why you need to pay particular attention to this preparation process.
Materials needed to prepare your frame
The embroidery hoop is the support on which you work, and it can also create a frame for your piece. Once your piece is completed, it can be left in the hoop, so it will stand out in a unique frame. Gimena recommends you pay attention to the selection of a good embroidery hoop and to the steps needed to prepare it, as follows:
- An embroidery hoop. This should preferably be made of wood and equipped with a tightening screw as this construction will tighten the fabric better. Plastic hoops tend to be of lower quality.

- Fabric strips. Short strips approximately 1 cm wide to bind the hoop. Ideally, this should be of the same material you'll be stitching on, but you can give your piece a unique touch using a different material that suits the embroidery. Also, it’s very practical to roll up the strips into spools ready to use later.

- Cold silicone glue. Any silicone glue, of any brand, will do, however, this must not be hot, as hot glue will leave a thick layer that can alter how the hoop holds the fabric.

Steps and tips to bind your embroidery hoop
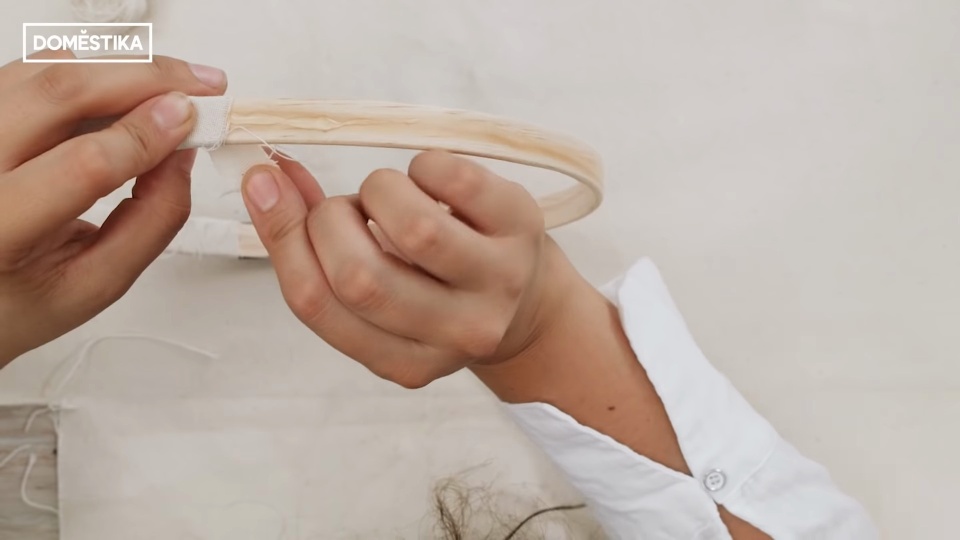
It's important to bind the embroidery hoop. This way it protects the fabric from stretching and avoids defects and scratches caused by the wood or plastic. We start with binding only the outer ring, as this is the one we see and can be a decorative element. If your hoop does not give enough tension or is worn out, you can improve its performance by binding also the inner ring, following the same steps.
- Separate the inner and outer rings. This is an essential step as the hoop works thanks to the pressure of both rings and binding them together would result in the embroidery hoop being useless.
- Apply the glue. Start binding the hoop from the tightening screw, that’s where the metal bit gives way to the wood. Apply the silicone glue for approximately 3 cm, so that the start of the strip (which you had rolled up into a spool previously) stays well fastened. It's important to remember not to apply glue to the whole hoop, but only at the beginning and at the end of each strip of fabric. This technique is the one you’ll use if you need to start a new strip.

- Fasten the start. To secure the start of the fabric, or when changing the strip (so it doesn't move and stays fastened), you can use a small clamp or peg. This allows it to be firm while you continue the binding process.
- Roll out the fabric strips. Keep binding the hoop as you roll out the strips. Apply a consistent pressure and try to avoid creases, as these would make the mounting of the rings difficult later.

- Finish binding. Reapply some glue to the final part of the hoop, where the wood joins up with the metal, and hold down the fabric with a little pressure. Cut any remaining fabric if needed, and glue it in the same way. Allow for the strip to dry before continuing.

Steps and tips for mounting the fabric onto the embroidery hoop to start stitching
The last step to prepare the hoop for your needlework is mounting the fabric. In this part of the process, you will verify if the fabric is sufficiently taut or whether you'll need to also bind the inner ring to avoid any loose areas.
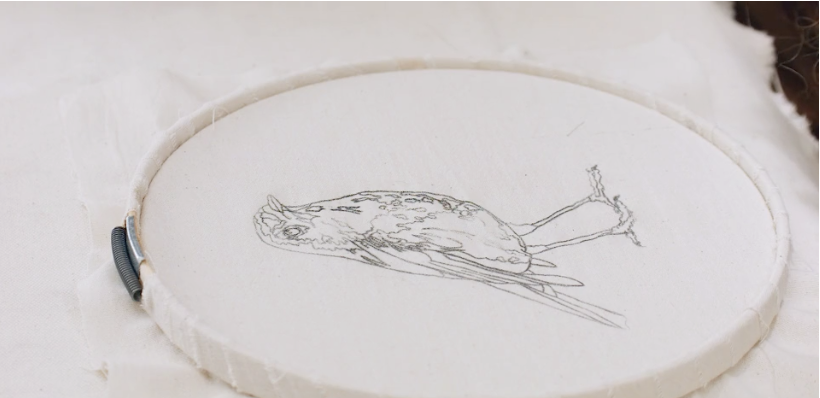
- Center the pattern. The first step is to center the fabric where you have previously drawn or traced the pattern into the inner ring, ensuring that the excess fabric on either side is the same.

- Mount the rings. Next, place the outer ring (bound and dry) on top of the fabric, paying attention to placing the tightening screw on top of the pattern.

- Press down and encase the rings. The final step is to press down the outer ring so that it encases the inner ring and keeps the fabric taut, without any creases.


Now that the fabric is ready in its hoop, it's time to get your needle and thread and start your embroidery.
Gimena teaches the course: Painting with Thread: Textile Illustration Techniques, where she instructs on techniques to create pictorial embroidery playing on colour and volume.
You may also be interested in these tutorials:
- Embroidery Tutorial: Herringbone Stitch
- Watercolor Tutorial: How to Paint with Watercolor Brushes and Pencils
- Illustration Tutorial: The Color Wheel


0 comments