


Adobe After Effects tutorial: how to animate an emoji in 6 minutes

Create a wink gif using After Effects, with illustrator and animator Moncho Massé
After Effects is a useful software for creating animated characters. Its interface and tools allow you to design and bring to life creations of all types and levels of difficulty.
If you are looking for quick and easy lessons for beginners, animating a wink emoji can be a great first step. Discover how to do it in the tutorial that Moncho Massé (@moncho_masse), professional illustrator and animator, has prepared for you. Enjoy it in the following video!
Click on the link below to download the After Effects file used in this tutorial. You will find it located in the Downloads folder on your computer.
Download the file below:
Join for Free and download
Archivo_After_Effects_Moncho_Masse.zip
[Create a controller for the face[/h]
Go to "Layer", then to "New" and finally to "Null Object". Then, rename the layer in your timeline, relate all the elements of the face to the Null Object and connect it to the head, so that when you move it everything is grouped together.

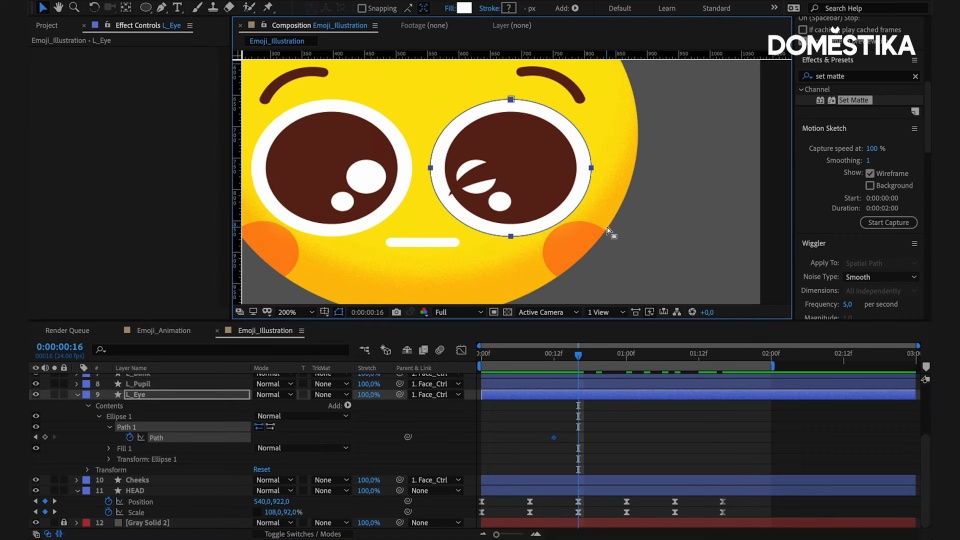
2. Add the Set Matte effect
This effect will help you to make the cheeks and pupils always look inside the head when the image is in motion. You will find the "Set Matte" tool in the Effects panel, and you should apply it to the element layers separately.

3. Animate the position and scale of the head
Create a keyframe and copy it every 8 frames. It is important that the figure always returns to the original position where the animation starts, so that the animation remains natural. To make it look non-linear, you can create an acceleration and braking curve by selecting all the keyframes and applying the "Easy Ease" option to them. You can then modify the curves in the Graph Editor and adjust them to make the animation look smoother.

4. Animate the face control
It is important that the elements of the face also follow the movement of the head, so when the head goes up, you should also move up the Null Object. This will add a three-dimensional effect to the animation.

5. Animate the wink
To do this, you must select the exact moment you want the eye to close and modify the shape by adapting it to the wink layer. Then, modify the curves again in the Graph Editor so that the eye closes at a good speed to make the animation look much more realistic.

6. Animate the eyebrows and the rotation of the head
Select the two eyebrows, press the P key and create two keyframes. When the head goes up, exaggerate the movement of the eyebrows by raising them a little more, and do the opposite when the head goes down, emphasizing the eyebrow of the winking eye. Then, select all the keframes, right click, select "Keyframe Assistant" and convert them to "Easy Ease" as well.
To improve the rotation of the head, go back to the corresponding layer, convert it to "Easy Ease" and give it a touch of movement to the left when it goes up, and to the right when it goes down and winks.

7. Desynchronize the face and head
This will help the animation look more dynamic. To do this, you will need to select all the keyframes of the Face Control and the winking eye, as well as the eyebrows, and offset them.

If you liked this tutorial and you are interested in learning how to design and give life to 2D characters, don't miss his online course After Effects: animate the first steps of your character
You may also be interested in:
- Animation and character design in After Effects, a course by Moncho Massé.
-Tutorial 3D modeling: how to turn a 2D design into 3D
- 9 free 2D and 3D animation sites with stock for your projects
- 5 curiosities about cartoons


0 comments