


Illustration Tutorial: exercises to learn to draw animals
Learn the Fist technique to draw animals with basic shapes from scratch
The good thing about drawing is that it gives us infinite possibilities: we can follow all the rules, or break them to let ourselves be carried away by our intuition and imagination. Regardless of whether we have a better or worse style, the important thing about drawing is that it allows us to express ourselves to have a good time of fun.
In the following video tutorial, illustrator and educator Puño (@puño) invites us to put aside shame to learn how to create animals with simple geometric shapes, just with a marker and a sheet of paper or cardboard. Based on his advice, we can begin to realize that drawing is within everyone's reach. Discover them below:
Square
Starting from a square, we can draw large and heavy animals, which correspond to the size and angles of this geometric shape. To start, we just have to draw a large square and draw four smaller squares at the bottom. We already have the body and legs, which we can improve by drawing an eme-shaped hoof at the bottom.
Now, we can add a queue. We just have to draw a line starting from the upper left corner of the square, and place some stripes at its end that will be like the hairs on the tip of the tail.
With this base, we can draw, for example, a hippopotamus: we add a head to one of the sides of the square, we add eyes, ears, a mouth, a nose and teeth, and we would have it. With the same head but varying its different parts a little we will get a rhinoceros, adding a pair of horns.


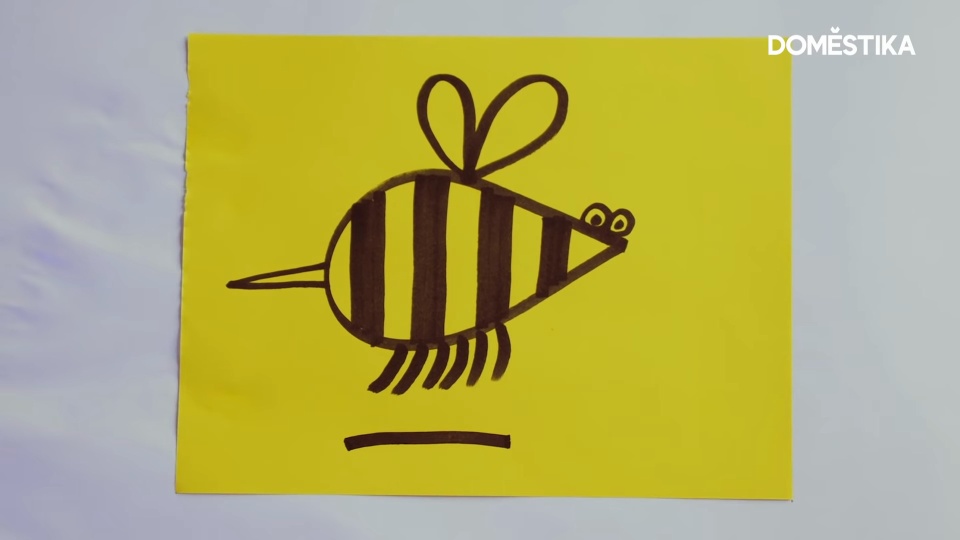
Drop
From a lying drop shape we can also obtain many animals. If we place a nose circle at its most angled end and some larger ear circles at its top, we will almost have a mouse. By adding some eyes, a mouth with two teeth, a tail and some lines for the legs, it will be complete.
Puño recommends adding a straight line below the character to achieve the effect of speed and jump, which gives more depth to the illustration.
Starting from the drop, we can also create a hedgehog. Add legs, nose, eyes and mouth, but don't add ears. Instead, draw some thick lines coming from the top of its back, which will act as spikes.
Another option is to make a bee: a pair of eyes on one side of the drop, a stinger on the other and a pair of wings on the top will allow us to begin to identify this insect. Complete it by adding six legs to the bottom and a vertical striped pattern to its body.


Circle and triangle
By combining these two simple shapes we can also obtain many animals. For example, with a circle on a triangle we will already have the head and body of a possible cat. Add pointed triangle-shaped ears, two almond-shaped eyes, an inverted triangle nose, a w-shaped mouth and whiskers to complete his face. Add a sinuous line to represent the tail and some stripes to get the legs.
Drawing a dog is very similar, but with some differences. Draw two drop-shaped ears, two dots for the eyes, a normal triangle for the nose, a w for the mouth and some dots on it, and we will have our own dog drawn. The legs are the same as those of the cat and the tail perhaps less sinuous.
With these same bases (circle and triangle) you can also create a tiger or a lion. Both have semicircle-shaped ears, a nose in the shape of an elongated triangle with a semicircle at the bottom, a w-shaped mouth and dot eyes covered by a straight-line-shaped eyebrow.
Add stripes to the tiger's body and tail, and a mane and stripes to the end of the tail to the lion. You can try different hair until you find the one you like the most.


Did you like this tutorial? Remember that you can learn with Puño to train the creativity of children and adults using only the hands, the brain and some basic tools in his online course 'Drawing and creativity for little great artists'.
You may be interested
- From beginner to superdrawer, a Fist course
- Drawing for beginners level -1, a Fist course
- Original illustration of your fist and tablet, a Fist course


0 comments