


Free Tutorial: How to Make a Plaster Mold for Ceramics at Home
Learn how to create a plaster mold for making your own decorative pieces with this tutorial by Paula Casella
Ceramics is an ancient technique that still holds a strong presence today. You can create beautiful artisanal pieces according to your preferences. Beyond the decorative aspect, working with your hands provides a moment of relaxation and creativity, disconnecting you from the outside world to connect with the material and your creation.
Today, you no longer need a special kiln, as many workshops and artisans rent their own for you to fire your pieces. You can also use non-firing clay with excellent results.
Paula Casella is a ceramist and a teacher of artisanal techniques who designs decorative and functional pieces. Her passion for ceramics and good food combines in her tableware designs. In this tutorial, you will learn how to create a plaster mold that you can use to make your own pieces.
Let's get started!

Materials You'll Need:
Plaster powder (recommended to buy from drugstores or ceramic shops)
* Dishwashing detergent or hand soap
* Bowl with water
* Brush
Steps to Follow:
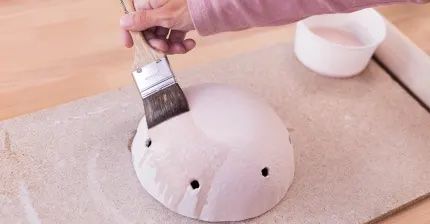
Start by applying the release agent (detergent or soap) with a brush to the bowl you will use to make the mold. This will help the plaster release easily.
Prepare the plaster.
There are no specific measurements. Paula suggests gradually sprinkling the plaster into the water. Do it evenly to avoid lumps or clumps.
When is the plaster ready?
You'll notice small plaster islands forming to indicate it's almost ready. Continue sprinkling in areas where there's still water. The ideal consistency is when the plaster is almost entirely covered, with some islands on the surface.
Ensure there are no lumps.
The trick here is to stir with your fingers. Once you have a homogeneous mixture, check that your nails aren't visible, and hand lines don't show. This is how Paula determines perfect plaster consistency.
Pour the plaster into the mold.
The crucial thing is not to fill it to the brim, leaving a few millimeters to facilitate demolding. Tap the mold on the table to remove air bubbles. If you touch the mold's edge, you'll notice the plaster is cool at first, then it'll become warm during setting, and finally cool again in a couple of hours once it's dry. Wait a couple of days for the plaster to fully set, then flip it, tap gently, and it will come out smoothly, perfectly smooth. Now you have your mold ready to prepare your set!
Do you want to start making your ceramic set? Begin Paula Casella's online course: Ceramics at Home for Beginners. Learn from scratch how to create your pieces, starting with molds and then crafting the items. Discover the endless possibilities of ceramics!


0 comments