Photo Editing Tutorial: How to Use Presets in Lightroom

Learn professional techniques for applying and editing preset filters to achieve a consistent creative style in your images
When it comes to establishing an aesthetic across your images, presets are an invaluable tool for photographers of all experience levels. They allow you to apply the same filter to multiple photos, controlling settings like color, brightness, hue, and more to achieve a style that’s recognizably yours.
Teresa Freitas (@teresacfreitas) is a Portuguese photographer known for her colorful images that have seen her work with brands including Netflix, Dior, and Polaroid.
In this tutorial, she shows you how to apply presets to your images in Lightroom, and edit them to enhance colors and details. Explore everything from saturation and vibrance to shadows and luminance to create a collection of professional-looking photos that complement each other.
1. Pay attention to each image individually
Presets are a useful first tool in the photo editing process, especially for creating a consistent style across your images. But Teresa also emphasizes the importance of adjusting each image in isolation.
Depending on the conditions it was taken in, lighting, subject, and shadows are a few factors that can impact the overall look of an image which makes individual edits just as important as applying the initial preset.

2. Change temperature to make the image warmer or cooler
After applying the preset in Lightroom, begin the editing process, starting with temperature. A photo’s temperature refers to whether it is cool or warm in tone and it’s an important factor to consider when editing with consistency in mind.
In this case, Teresa’s photo is too golden for her taste so she opts to lower the temperature, making it appear bluer.

3. Adjust the saturation of individual colors
Saturation gives you the power to both make a color stand out or blend in, depending on your desired outcome. You can also adjust the saturation of your image as a whole or, individual colors.
Using the hue, saturation, and lightness (HSL) tool, see how reducing the saturation of green in the example photo helps the sky in the background to stand out.

4. Mix muted tones and vibrant colors
Each photographer’s style is different, but for Teresa—whose aesthetic is recognizably vibrant—mixing both bright colors and more muted tones is a key part of her creative process.
Experiment with bright and muted colors to achieve balance in your images by combining the two to establish contrast and depth.

5. Use exposure to add brightness
Moving on to the second photo in her tutorial, again adjusting the saturation, Teresa demonstrates how it can be used to counterbalance the stark interplay between light and shadow.
To do so, she uses the exposure tool, as well as lightening shadows. Experiment with these settings to bring a brighter, airier feel to your photography.

6. Experiment with contrast to create depth or flatten an image
Contrast has a similar effect. Discover how increasing it can add depth and dimension to a photograph while lowering it can help to flatten an image, bringing details from the background to the foreground as seen in the tutorial video example.

7. Use vibrance to add subtle saturation
Teresa demonstrates how to bring down the saturation of the overall image, as well as individual colors. She opts for the vibrance tool for a more subtle change of color, before moving on to editing particular shades using the HSL tool which she describes as her favorite in Lightroom.

8. Experiment with hue to make colors more harmonious
A harmonious color palette is an essential part of any well-edited image, especially if it forms part of a collection. Hue is the ideal tool for this. It allows you to play around with a range of different colors to achieve shades that are more complementary.

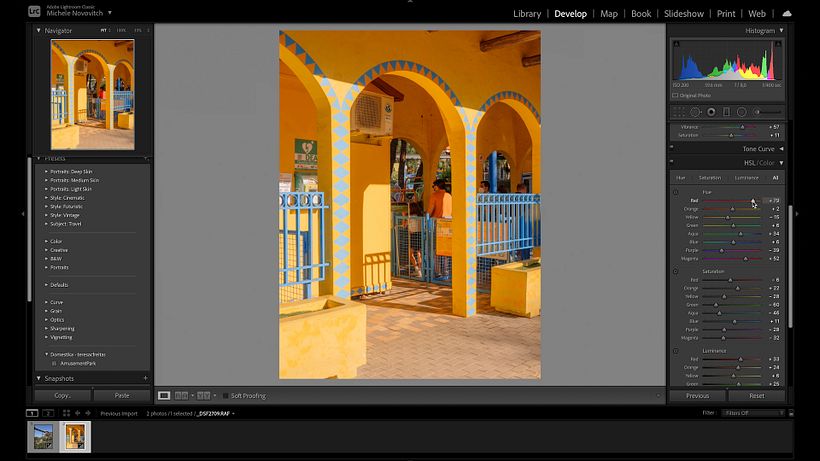
9. Shift luminance to highlight colors and patterns
With your edited colors, try the luminance tool to adjust the brightness of a color and make them stand out from the rest of the image.
It’s one of the final touches Teresa covers and, in her case, it helps to draw attention to the colors and patterns of the building in her photo. Take a look at the before and after to see just how powerful luminance can be.

10. Compare your images for style and consistency
While Teresa begins by highlighting the importance of editing each image individually, to finish she recommends comparing your edited images to see how well they work together.
Use the reference view to see your images side by side so you can easily make any final changes with your style and consistency in mind.

Want to take your knowledge of photography further? In her course Photography with Color: Create a Cinematic Look, Teresa teaches you how to create unique, colorful images in an urban environment using composition and editing techniques.
Explore more top photography tips with these resources
- Want to learn more new skills? Discover 20 free photography tutorials for beginners.
- Learn how to create expressive images by exploring identity and iconic references with David Ayllon's course, Portrait Photography: Retouch and Composite Vibrant Images.
- From composition to editing, discover 12 online photography courses to master skills in 12 months.


0 comments