Dynamic Character Illustration
Course final project
A course by Thomas Rohlfs , Illustrator


About the final project for: Dynamic Character Illustration
Characters in motion
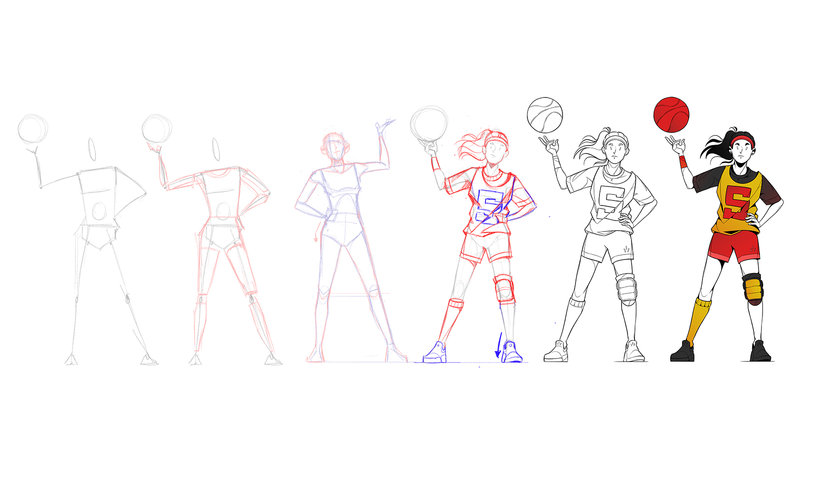
“Here we are at the end of the course! Thank you so much for joining and for completing all the lessons. I genuinely hope you've picked up some useful techniques and fun new ways of drawing characters. Now, you're ready to begin your Final Project. Here's the challenge: I would like you to create your very own character, complete with a cool outfit and gear! Follow along to see how I created my Final Project. And if you ever get stuck, make sure to go back to have another look at the lessons or the tasks and resources I've provided. They just might help you breakthrough! Step 1: Inspiration The first step is to get inspired! Don't just sit down and try to draw from imagination. Look for references! And put them in a Pinterest mood board or a Photoshop collage. Or a traditional collage, using scissors and a big sheet of paper. Whichever works best for you. You'll need at least one reference image for the pose, one for the outfit, and one for gear and accessories. Step 2: Sketch a stick figure and basic shapes Now that you have plenty of ideas and are truly inspired, start with sketching out the pose. We'll keep it as simple as possible during this stage, so a stick figure will do just fine. Sketching a stick figure is all about proportions. Try to sketch them as accurately as you can. Look where all the joints are and draw them as little circles. When you're happy with the pose, go ahead and draw some basic shapes on top. Don't forget to create a new layer first! Think bendy cylinders for arms and legs and triangles for the feet. Look at your reference and see which limbs move forward and which ones backward. Adjust the angle of your cylinders accordingly. Step 3: A bit of anatomy This step is all about connecting our basic shapes and adding a bit of detail while doing so. I know this is a challenging step. So remember, you're not in an anatomy class, and you don't have to draw each muscle! Your reference image is essential. Study each part of the body closely, one by one. What shapes do you see? Look at the angle of the face, then see how the neck is connected to the torso. Look at the shoulders, the upper and lower arm, the position of the hands. Go all the way down to the feet. Try and integrate as many of the subtle curves and angles of the body into your sketch. Also, don't be afraid to make changes at this point. You don't have to copy your reference completely. For example, I changed the position of both arms because I thought it would look more natural. Step 4: The outfit Your character feels a bit exposed right now. So why not start working on the outfit (on a new layer!). Think of the figure as a 3d shape on which you'll drape the fabric. Keep in mind that folds in the fabric can add extra movement, depending on the direction you draw them. Your character's line of action and rhythm are excellent guides for where to place your lines! Step 5: Linework Going from sketch to linework requires an entirely different mindset. We now have to draw very precise lines. Your first few lines will probably be challenging but just start somewhere. It gets easier when you're a bit further along. Before you start, make sure to enlarge your canvas by a factor of 4 (or more if your computer can handle it)! You want to be working in a file that's at least 5000px. Remember to use 2 line weights! A bigger brush for the outline and larger shapes, and a smaller one for construction lines and details. Try and use your whole arm to create fast and smooth lines. Don't just use your wrist. This might take some getting used to :) Step 6: Color You're ready for the final step! Let's add some color to our character. If you have a reference image for colors, use it! If not, you can probably wing it for now. For easy coloring, remember to use the actions I've made available! Start with the base layer for your character, then add a shadow layer. In between those two layers go all your other color layers. You can create as many or as few as you like. If you want to go the extra mile, add some subtle gradients. Or use color adjustment layers to finetune your colors (or to mess them up).
Partial transcription of the video
“So we've reached the end of the course. I hope you found it useful and might have picked up some new methods or techniques. May all your characters be dynamic. I've showed you my background and my old work. and my struggle to get to my current illustration style. We've talked about following your heart and not to get stuck in a job you might not want to do. I hope this inspires you to draw more and feel more confident. We all have to switch the paths that we're on every once in a while. Next, I've shown you the different techniques that I use to draw and construct characters. It's just a se...”
This transcript is automatically generated, so it may contain mistakes.
Course summary for: Dynamic Character Illustration
-
Category
Illustration -
Areas
Character Design, Comic, Creativity, Digital Drawing, Drawing, Manga, Traditional illustration

Thomas Rohlfs
A course by Thomas Rohlfs
Inspired by street fashion, comics, old school tattoos, and his trips to the Far East, Thomas Rohlf’s work consists of confident lines, minimal color palettes, and dynamic characters. During his career as an illustrator, the Amsterdam-based creator has collaborated with a wide range of brands and studios, including AKQA, Wired, Ueno, New Scientist, and Mathematic.
In conjunction with his illustration work, Thomas also runs a small print shop from his Amsterdam studio where he creates beautiful giclée fine art prints.
- 99% positive reviews (505)
- 12,828 students
- 32 lessons (7h 0m)
- 14 additional resources (2 files)
- Online and at your own pace
- Available on the app
- Audio: English, Spanish (Latam), French, Italian, Portuguese, Turkish
- English · Spanish · Portuguese · German · French · Italian · Polish · Dutch · Turkish
- Level: Beginner
- Unlimited access forever
Category
Areas