


Manga Tutorial: How to Draw Princess Mononoke
Join professional manga artist Natalia Batista as she shows you step-by-step how to draw manga character Princess Mononoke
Manga is the Japanese style of comic book and graphic novel aimed at both adults and children. While it is said to originate all the way back to the 12th century in Japan, it didn't reach worldwide popularity until the late 20th century, thanks to Japanese animator Osamu Tezuka’s series, “Astro Boy.” It now enjoys a huge global fanbase, and its distinctive style, including large, glistening eyes, slender silhouettes, and cartoonish characters in realistic settings, provides inspiration for many artists and illustrators.

If you’re already a fan of manga, you’re sure to have come across Princess Mononoke, written by Hayao Miyazaki and published in 1993. It was later made into an animé film by Studio Ghibli in 1997, breaking records when it was released in Japan by achieving a box-office revenue of 19.3 billion yen. The story tells the tale of a young prince named Ashitaka, who embarks on a mission to find peace between the supernatural guardians of a forest and the humans who consume its resources. Along the way, he befriends Princess Mononoke, a beautiful young woman who also goes by the name of San or Wolf Girl, as she was raised by a family of wolves.

Natalia Batista (@nataliasmanga) has been a professional manga artist and illustrator for over 14 years. She works in different genres from action and fantasy to romance and comedy, but is best known for series such as Mjau! and Sword Princess Amaltea, which have been published in Sweden, the USA, Italy, Germany, Portugal and the Czech Republic. She’s also a member of the manga artist collective Nosebleed Studio, as well as co-organizer of the annual comic festival Seriefest in Malmö. Natalia loves every part of manga, from drawing to teaching her skills to aspiring manga creators. In this tutorial, she shows you step-by-step how to draw Princess Mononoke using pencil and then adding detail with a pen and ink.
How to Draw Princess Mononoke
You will need:
A G pen
Black ink
Anti-foul glove to protect from smudging
Paper
A mechanical pencil for sketching
An eraser
A ruler
A sheet of screentone
Tone scraper
A white gel pen
A knife
Step 1: Draw the face
Natalia has decided to draw a full-body sketch of Princess Mononoke in a cool pose. She begins with the head, which she makes by drawing a circle shape, followed by one vertical line down the center to mark the position of the nose and mouth, and another horizontal line across the face to mark the eyes.
Step 2: Draw the upper body
To follow Natalia’s process, it’s essential to understand the proportions of each part of the character’s body. Using an eraser, she measures the length of the head, and then multiplies this by three to calculate the whole length of the upper body (head included).

Step 3: Add the legs
The legs are usually the equal size of the upper body, but Natalia is going to choose a kneeling pose, so she must calculate the length of the upper leg and calf separately. First, she measures the overall length of the upper body, from the top of the head to the crotch. The bottom half (from the middle of the body down to the crotch) will be the same length as the upper leg. The upper half, from the middle of the body to the top of the head, will be the same length as the calf.

Step 4: Draw the arms
Natalia measures the length from shoulder to waist line to calculate the length of the upper arm. The lower arm will be the same length.

Step 5: Add some details
Now it’s time to add some clothing, even if it’s just the basic outline. Natalia creates movement in her clothing, to give the effect of a breeze blowing.
Step 6: Time to ink
Natalia uses a G pen, which is typical for manga artists and has a steel nib. She dips her pen into her inkwell and starts to carefully add depth and detail to her pencilled sketch. You can also use parallel lines called “hatching” or lines on top of each other called “cross-hatching” to create shade and shadows to your drawing.

Step 7: Cut out your screentone
Screentone is a material that allows you to add patterns, shade, or texture to your work, similar to cross-hatching. Natalia will use this material to create a skirt for Princess Manononke. When the ink has dried, take your eraser and carefully rub out the pencil lines. Then take your sheet of screentone and place it over your drawing, so that you can see the outline of your sketch underneath. Using a knife, gently cut along the screentone to create the outline of the shape of the skirt. You can then use the knife to life the corner of your cut-out and carefully peel away the piece of screentone before applying it to your illustration.

Step 8: Stick down your screentone
Place your screentone skirt on top of your character, then take the original sheet of screentone paper and place it on top. Natalia uses her tone scraper to make gentle scraping motions on top of the paper, which will encourage the screentone underneath to stick to the design. Then she uses her knife to cut away any excess screentone.

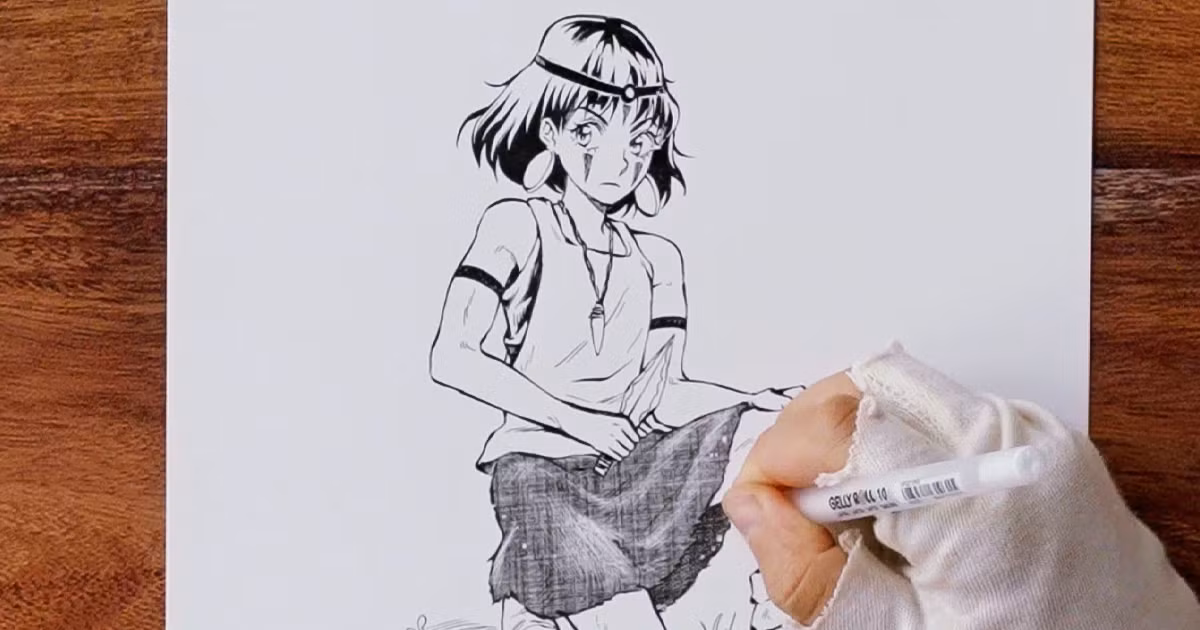
Step 9: Add the finishing touches
Natalia then scrapes directly on top of her screentone skirt to create some highlights and depth. You can also use a white gel pen to add white to certain areas of your screentone, which will give the impression of movement, such as blowing wind or dust.

Did you enjoy this tutorial? If you’d like to find out more about how to create unique manga characters full of personality from scratch, along with lots of original illustration tips and techniques, then check out Natalia’s course “The Art of Manga: Draw Unique Characters.”
You May Also Like:
- What Are the Key Characteristics of Manga Illustration?
- Illustration Tutorial: How to Draw Manga Faces Step by Step
- Drawing Manga Characters from Scratch, a course by EUDETENIS
- Complete Guide to Anime and Manga Terms


4 comments
Thank you so much for this!
Thanks for sharing this information it’s very useful. https://mangakakalot.so/
lovely article I love it! I'm gonna share this to my friends! https://mangafreak.to/
Please continue this great work and I look forward to more of your awesome blog posts. mangaowl.to