


Embroidery Tutorial: How to Transfer Your Design from Paper to Fabric
Learn how to transfer your illustration from paper to fabric using carbon copy paper, with Koral Antolin
All you need is thread, a hoop, a needle, and a little patience to transform a blank canvas into a masterpiece. Embroidery is an entire world of different stitches, styles, and techniques, yet each piece begins the same way: a drawing on fabric. How can we get the best results when transferring the design? The answer is much simpler than you might have thought.
The work of designer and embroiderer Koral Antolín (@koralantolin) fuses two of her great passions: drawing and embroidery. She is the founder and one of the creatives behind Fábrica de Imaginación and Studio.fi. Koral’s work combines embroidery stitches using a traditional neele and a Kantan needle to create unique portraits.
In this tutorial, Koral Antolin will teach you how to transfer your illustration from paper to fabric using carbon copy paper for fabric, step by step. Discover more in the video below:
Five tips for transferring your design from paper to fabric
1. Get the materials
First of all, think about what you want to embroider. Let your imagination loose; look for inspiration; sketch ideas; and then finish your illustration. Once you have your final design on paper, it is time to transfer it to your fabric. These are the materials you will need:
–carbon copy paper for fabric (not for paper, as the material used is different and will be difficult to remove)
–a hard pencil, a burin, a fabric pen or a normal pen without ink
–fabric that’s suitable for embroidery or the garment you want to transfer your design onto
–tailor's chalk
–pins to fix the design in place
Then, position your design. Mark the center of the fabric using a tape measure or by folding it in half.

2. Position the carbon paper and start tracing your design
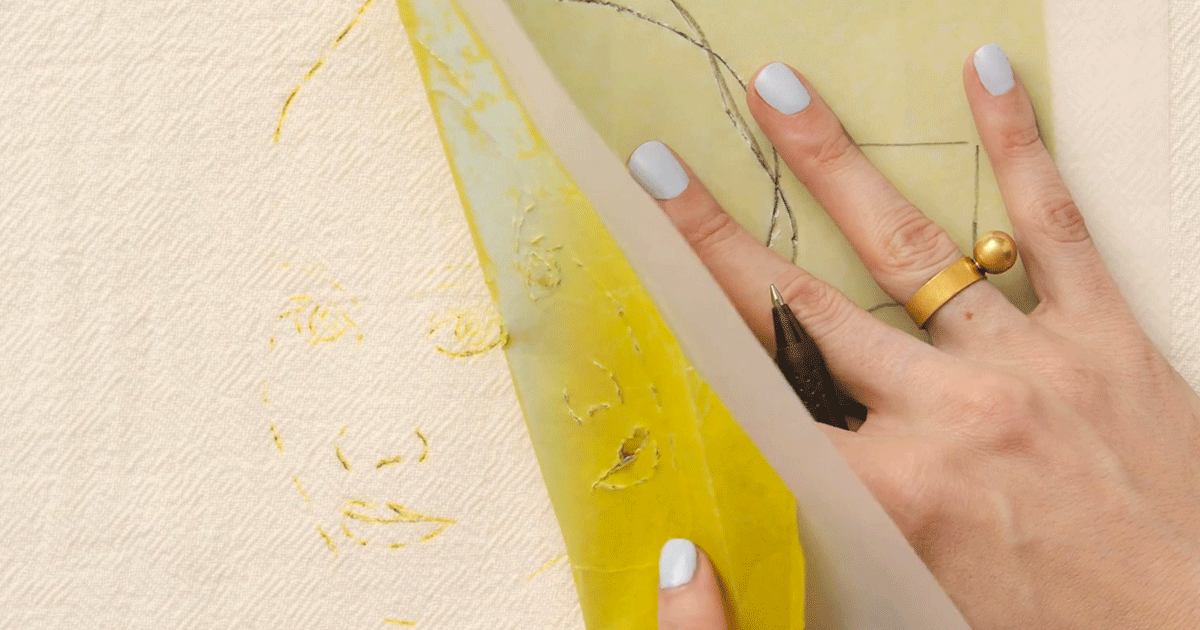
Koral Antolin recommends positioning your original design on the fabric first to see where it fits best. Then, it's time to position your carbon copy paper on top of your fabric. Make sure it faces downwards, with the yellow side against the fabric. Place the drawing on top. If necessary, fix the design to the carbon paper with a pin, to stop it from moving about while you’re tracing your drawing.

When working on portraits, our expert recommends starting with the subject’s eyes, since they will be the most challenging part of the face. Use a hard pencil, a burin, a fabric pen or a normal pen without ink to trace your design. Then, if we accidentally puncture through both sheets of paper, going through to the fabric, we can easily erase any marks and the fabric won’t get damaged.

3. Check your drawing has been correctly transferred
If you want to repeat your design several times, don’t trace over your original drawing. Carefully follow the lines of your drawing to avoid staining your garment. Remember to check that the design has been transferred correctly. Once you have traced all of the lines of your image, pay attention to small details.
When working on a portrait, check that the nose, eyebrows, eyes and mouth have transferred correctly.

4. Go over your design
If you notice that areas of your design haven’t been transferred correctly, go over them again. Peel back the paper and check again. You can use a ruler to mark straight lines.

5. Explore other options
If you struggle to find carbon paper for fabric, there are other options you can explore. You can trace from your computer or use tailor's chalk. Go over the line of your original drawing with the chalk. Position your paper and transfer your design. When using chalk, you will probably have to go over the design again, since it is more difficult to transfer.

If you have enjoyed this tutorial, remember that you can learn to combine embroidery stitches using a traditional needle and a Kantan needle to create unique portraits in Koral Antolín’s course, Embroidered Linear Portrait.
You may also like:
–Creation of Embroidered Portraits
–Character Illustration with Needle and Thread
–Beaded Embroidery Portraits


0 comments