


Adobe Illustrator tutorial: how to vectorize an image

Learn an easy technique to vectorize a sketch with Adobe Illustrator's pen and fill brush tools
Vectorization consists of converting images that are made up of pixels into images made up of vectors. And why would we want to change pixels to vectors? The image composed of vectors, compared to an image composed of pixels, maintains the quality and definition without altering even if it changes size. Vectorization is very useful, not only so that the image does not become poorer in visualization and quality, but it also provides it with many more printing possibilities: it prevents the image from appearing pixelated, allows animations and facilitates the work of designers.
How to vectorize an image?
Drawing all the contours and fills of the image with Bézier curves, a system that was developed in the 1960s for the tracing of technical drawings and whose successors are the ones created in vectorization programs such as Illustrator. Óscar Lloréns (@ollorens) shows us the technique he uses in his online course Express Illustration with Illustrator and Photoshop to vectorize a sketch, a technique that we can apply to any image we want to vectorize.
1. Select the image and open it in Illustrator
Start by opening the Adobe Illustrator program, creating the artboard according to the measurements or specifications needed and open the sketch in a layer to use it as a reference.

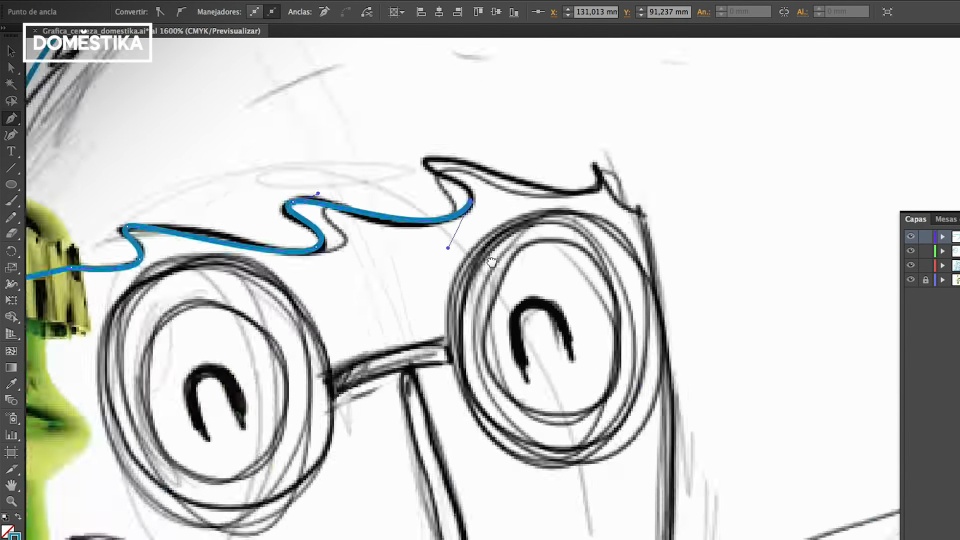
2. With the pen tool start the vectorization process
Create a new layer to start vectorizing with the pen tool, located on the left toolbar. Zooming in helps to observe the details of the image.
Place the pen at one point and stretch it to the next, opening or closing the curve according to the outline of the sketch. To vectorize eyes, glasses or any round element, using the geometric shapes in the toolbar, such as the ellipse, helps in this process.
3. Change the color of the line stroke to visualize the result
With the stroke selected, go to the upper right color window and select a color that stands out from the background. It is important to pay attention to change the stroke color and not the fill.

4. Use different layers
A tip when vectorizing an image or sketch, is that the more layers you use for the different elements the better the result will be.
5. Correcting errors
Any errors or mistakes can be corrected as the vectors are made.
6. Complete the vectorization
To complete the vectorization you have to close the point with the pen in the place where you started, even if you are not going to see it, because it is important to apply fill color.
7. Tips to keep in mind
- For elements like the eyes, which have been created as strokes, you have to convert them to fill: in the top menu "Object" go to "Stroke" and create outline.
- It is advisable to check from time to time how it is turning out to avoid mistakes, hiding the layer of the sketch.
- If the sketch has a series of random curves in a row, like the lemon squirt in this beer, you can use the pencil tool to go faster.
- All the details that add to the illustration will be appreciated in the final finish (if there are some defects they can be corrected later with Photoshop).

8. Coloring to finalize the vector
Now that the vectorized sketch is ready, the only thing left to do is to color the piece. Don't forget to save the final project in .ai. And then choose the color palette you will use to finish your vector design.
Raster and vector formats you can use:

Difference between raster and vector:

Learn this and other tricks from Óscar Lloréns in the course Express Illustration with Illustrator and Photoshop.
You may also be interested in:
- Digital Illustration with Illustrator and Photoshop.
- Character illustration with style.
- Vector illustration for beginners
- Illustration for non-illustrators.


0 comments