About the final project for: Specialization in Miniature Design and Decoration Techniques
Miniature Art & Design Specialization
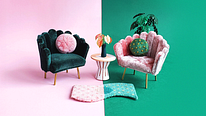
“Final Project: Miniature Interior & Decor Collection Objective The objective of this final project is to combine the range of techniques you've practiced throughout the specialization to create a cohesive miniature interior scene. Your final piece should reflect not only your technical skill and attention to detail, but also your personal aesthetic and storytelling abilities. The miniature environment may take the form of a room, a section of a house, or a complete small-scale setting—brought to life through furniture, decorative elements, and personal touches. Project Description This project invites you to design and build a miniature space that feels complete, thoughtful, and expressive. You will construct a furnished interior using a mix of handmade elements—including architecture, furniture, textiles, and accessories. To bring narrative and charm to your scene, include at least one personal or symbolic detail, such as a miniature book, an embroidered piece, or another handcrafted object that makes the space uniquely yours. In addition to the final build, you will document your process through sketches, material tests, and photos, and create a visual mood board to guide the atmosphere and style of your interior. Project Components 1. Concept and Mood Board • Choose a theme or story for your miniature space: cozy, vintage, modern, fantastical—whatever speaks to you. • Build a visual mood board with references for colors, textures, lighting, and furniture style. • Decide on the scale you’ll be working in and define your materials and design plan. 2. Design and Prototyping • Sketch the room or house layout, including key architectural features. • Design and prototype 3–5 decor elements such as furniture, rugs, shelves, cushions, curtains, or lighting. • Begin testing materials and construction techniques, adjusting as needed for durability and precision. 3. Building the Miniature Scene • Construct the structure: walls, floors, windows, doors. • Assemble and install your handmade decor items, ensuring scale and proportion feel balanced and realistic. • Add one personal detail—a small handmade book, an embroidered napkin, or a custom object with symbolic value. 4. Styling and Finishing Touches • Style your miniature interior thoughtfully: consider composition, layering, and the placement of objects. • Add fine details like textures, wear, and lighting effects to give your scene depth and life. • Photograph your scene from multiple angles to show the space clearly and beautifully. 5. Documentation and Reflection • Collect your sketches, mood board, and in-progress photos. • Write a short description of your concept, the mood or story behind your space, and the choices you made along the way. • Reflect on the creative process—what you discovered, what challenged you, and what you’re most proud of. Step-by-Step Process 1. Inspiration and Mood Board • Define a tone, style, or story for your interior. • Collect references for shapes, colors, and textures. 2. Sketches and Planning • Design the room layout and decor elements. • Choose your materials and define your scale. 3. Prototyping and Testing • Test out furniture forms, textures, and structural pieces. • Adjust details for realism, proportion, and durability. 4. Construction • Build the architectural frame and fill it with handmade decor. • Add a personal or symbolic item to give the space a narrative layer. 5. Styling and Photography • Arrange your pieces with care. • Document your final scene with high-quality images. 6. Reflection and Documentation • Present your mood board, photos of the process, and final result. • Write a short concept summary and personal reflection. Final Delivery The final submission should include: • A miniature room or interior scene fully furnished and styled. • 3–5 handmade decor elements (furniture, textiles, or accessories). • One miniature book or embroidered/personal object that adds a narrative or emotional layer to the scene. • A mood board and visual concept that supports the design. • Process documentation: sketches, material references, and work-in-progress photos. In the miniature world, the smallest details hold the greatest meaning. A single chair, a folded cloth, a tiny book—each one whispers part of a story. This is your invitation to create a space where imagination thrives in every corner. Let your hands and heart shape an interior that reflects your style, your care, and your unique point of view. With this project, you’re doing more than building a room—you’re bringing an entire world to life, one beautiful detail at a time.”
Course summary for: Specialization in Miniature Design and Decoration Techniques
-
Category
Craft -
Areas
Art Toys, Arts & Crafts, Bookbinding, DIY, Embroidery, Toy Design

Domestika
A specialization by multiple teachers
- 100% positive reviews (1)
- 190 students
- 88 lessons (14h 45m)
- 105 additional resources (38 files)
- Online and at your own pace
- Audio: English, German, Spanish, French, Indonesian, Italian, Dutch, Polish, Portuguese, Romanian, Turkish
- Spanish · English · Portuguese · German · French · Italian · Polish · Dutch · Turkish · Romanian · Indonesian
- Level: Beginner
- Unlimited access forever
Category
Areas