Manual Printing for Photopolymer Stamps
A course by Fábrica de Texturas , Design Workshop

Joined February 2015


Discover stamping and engraving techniques using household tools
Joined February 2015
As the name suggests, a photopolymer is a material that reacts when exposed to ultraviolet light and can be used to create stamps through photoengraving. With a few simple tools and an easy-to-follow process, anyone can make photopolymer stamps of an illustration or design.
In this online course, Gabriela Rodríguez and Xavier Robledo from Fábrica de Texturas, a Madrid-based studio and workshop, teach you how to create your own photopolymer stamps, as well as stamping techniques to get different textures and finishes.
If you're interested in learning more with Fábrica de Texturas, check out their first course DIY Binding Techniques.
What will you learn in this online course?
15 lessons & 11 downloads
- 98% positive reviews (403)
- 10,388 students
- 15 lessons (1h 59m)
- 11 additional resources (8 files)
- Online and at your own pace
- Available on the app
- Audio: Spanish, English
- Spanish · English · Portuguese · German · French · Italian · Polish · Dutch
- Level: Beginner
- Unlimited access forever
- Updated on 07/05/2019
What is this course's project?
Create a print on paper of an illustration or your own design.

Projects by course students


Who is this online course for?
Designers, illustrators, and anyone interested in stamping or engraving who wants to learn how to make photopolymer stamps at home.
Requirements and materials
No previous knowledge is required, although basic notions of Adobe Photoshop or Illustrator are recommended.
As for materials, you need a photopolymer baseplate and a UV exposure unit, but you can use the sun or a UV flashlight if you don't have one. You will also need water-based paint, paper, and rollers.

Reviews

Fábrica de Texturas
A course by Fábrica de Texturas
Fábrica de Texturas is a 100% Do-It-Yourself project based in Madrid since 2012. Behind it are Gabriela Rodríguez and Xavier Robledo, two lovers of handmade design whose philosophy is centered around experimenting with artisanal techniques and visual arts to make them modern and accessible to everyone.
Their DIY kits and workshops have become so famous that brands such as Tommy Hilfiger, Ikea, Mahou, Fnac, and DaWanda call on them for all kinds of collaborations and events.
Content
-
U1
Introduction
-
Presentation
-
Influences
-
-
U2
Modern Engraving
-
Manual printing systems
-
Engraving and photogravure
-
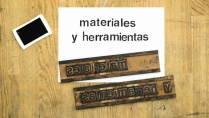
Materials and tools
-
-
U3
Photopolymer stamp production
-
Step by Step
-
Preparation of negatives
-
Preparation of negatives II
-
Sunstroke options
-
Tips and frequently asked questions
-
-
U4
Stamping
-
Seal assembly and stamping
-
Inks, finishes and textures
-
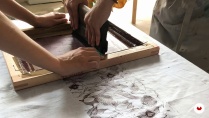
Manual Stamping
-
-
U5
Print
-
Registration Marks
-
Different types of printing
-
-
FP
Final project
-
Manual stamping with photopolymer seals
-
What to expect from a Domestika course
-
Learn at your own pace
Enjoy learning from home without a set schedule and with an easy-to-follow method. You set your own pace.
-
Learn from the best professionals
Learn valuable methods and techniques explained by top experts in the creative sector.
-
Meet expert teachers
Each expert teaches what they do best, with clear guidelines, true passion, and professional insight in every lesson.
-
Certificates
PlusIf you're a Plus member, get a custom certificate signed by your teacher for every course. Share it on your portfolio, social media, or wherever you like.
-
Get front-row seats
Videos of the highest quality, so you don't miss a single detail. With unlimited access, you can watch them as many times as you need to perfect your technique.
-
Share knowledge and ideas
Ask questions, request feedback, or offer solutions. Share your learning experience with other students in the community who are as passionate about creativity as you are.
-
Connect with a global creative community
The community is home to millions of people from around the world who are curious and passionate about exploring and expressing their creativity.
-
Watch professionally produced courses
Domestika curates its teacher roster and produces every course in-house to ensure a high-quality online learning experience.
FAQs
Domestika's courses are online classes that provide you with the tools and skills you need to complete a specific project. Every step of the project combines video lessons with complementary instructional material, so you can learn by doing. Domestika's courses also allow you to share your own projects with the teacher and with other students, creating a dynamic course community.
All courses are 100% online, so once they're published, courses start and finish whenever you want. You set the pace of the class. You can go back to review what interests you most and skip what you already know, ask questions, answer questions, share your projects, and more.
The courses are divided into different units. Each one includes lessons, informational text, tasks, and practice exercises to help you carry out your project step by step, with additional complementary resources and downloads. You'll also have access to an exclusive forum where you can interact with the teacher and with other students, as well as share your work and your course project, creating a community around the course.
You can redeem the course you received by accessing the redeeming page and entering your gift code.

yggdrasil63
PlusBuena explicación y buena estructura. Muy valioso para los que nos gusta la estampación artesanal. Muy didáctico.
View translation
Hide translation
nskreativ
Sehr gut erklärt, leider ist das Zubehör nicht einfach zu beschaffen in Deutschland.
View translation
Hide translation
abeledo_carolina
Interesante curso para iniciarse en la tecnica de sellos, y en el grabado.
Los profesores me gustaron, Gaby es muy clara y detallada explicando y da tips buenos por ej, en tintas.
View translation
Hide translation
yadiramveras
El curso es muy interesante para iniciar en el estampado de diferente superficies creo que lo utilizare para mi proyecto.
View translation
Hide translation
nataliaalvis_bio
Muy bien explicado y sencillo de aplicar.
View translation
Hide translation