Creating 3D Image Design for Beginners with Cinema 4D and Redshift
Course final project
A course by Farid Ghanbari (RenderBurger) , Art Director and 3D Artist
")
Joined February 2020


Joined February 2020
About the final project for: Creating 3D Image Design for Beginners with Cinema 4D and Redshift
3D with Cinema 4D and Redshift for Beginners
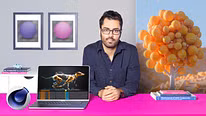
“Hi there! So we reached the end of the course! It was a pleasure to share my work and my creative process with you. My choice was to create a 3D stylish garden. I started by introducing to you the Cinema 4D interface and main menus. Among all the available tools and options, I picked the most useful ones so you would gather a solid enough knowledge of the software, like deformers, moGraph, and Cinema 4D fields. I also showed you cloners and instances. We saw how effectors control every tiny detail of cloners in a powerful way. After learning the fundamentals of Cinema 4D, you learned about our rendering engine: Redshift. I showed you its interface and the main tools. You finally started the practical project and created the base. We moved to the next level and built the hero: our stylish tree and plants. You quickly learned how to use deformers to modify a simple primitive to create our tree trunk. You also learned how easy it is to add hundreds of leaves to the tree at once and how to use cloners to adjust their sizes and rotation. Then you learned how to set up the camera for 3D and how to make stylish bushes and apply them unevenly. I have asked you to work on your final project model and post your progress regularly. Now, I want you to put all the pieces together and submit the whole process, using the feedback you gathered, both mine and your peers'. Remember that the whole process starts by picking the right primitives. By playing and manipulating the primitives and the placement of the camera, you can start creating a solid canvas where to place the elements of the project. We learned how to set up the lighting, creating materials and adding depth of field to the rendering, and finish our render setting. As the final stage, you understood the importance of post-production to have an adjusted look and feel without re-rendering the scene. Once the base is ready, I suggest that you work on the model. In my case, I picked a cylinder to start working on my tree. To shape it into form, I gave it taper. Such tweaks make a given design stylish. While the trunk is the core of the model, you also have to pay attention to other elements, like the branches and leaves in my case. Playing with primitives and the shape modification tools is what helps us build the model up. If you are happy with a given element, you can duplicate it and use it somewhere else within the model (by rotating it, for example). If you were to have a few objects, cloning is also advisable. The camera setup is a key step in the process, especially when it comes to focal length, as I have shown you in the course. The feel of it depends on the scale you want to give it. If you were to add assets such as bushes, follow my method, but adapt it to your creative vision. Once you have created these assets and have them placed all over your scenery, you should work on the lighting. If the lighting is right, you now have to focus on making each object feel unique by working on the materials. The color palette and the treatment of gradients and bright spots play a major role. The desired outcome is starting to come out, but tweaks in the camera setup and the render as a whole are needed. Once the render is ready, we give it the final touch-ups on Photoshop. These post-production touch-ups can alter (for the better) the feel of your work. The possibilities at this stage are endless, and you can go many routes. Throughout the course, I have provided you with plenty of info on using the Camera RAW filter. I encourage you to study it and play with it with your image.

Partial transcription of the video
“Hi there. So we reached end of the course. It was a pleasure sharing with you my work and my creative process. In this last lesson, we will review step by step together how I got to the final project. So then you can do your own project by following your influences and your ability. I started by introducing to you Cinema 4D interface and main menus. Among all the available options and tools, I picked the most useful one so you would have enough solid knowledge of the software, like deformers, moGraph, and Cinema 4D fields. I showed you cloners and instances, and also we saw how Effectors co...”
This transcript is automatically generated, so it may contain mistakes.
Course summary for: Creating 3D Image Design for Beginners with Cinema 4D and Redshift
-
Category
3D & Animation -
Software
Cinema 4D, Redshift Render -
Areas
3D, 3D Animation, 3D Design, 3D Modeling

Farid Ghanbari (RenderBurger)
A course by Farid Ghanbari (RenderBurger)
Farid Ghanbari is an Art Director and 3D artist from Shiraz, Iran who is currently based in Philadelphia, USA. He works at 3Fx Inc, and as a freelance art director. He is a self-taught 3D artist with over twelve years of experience who discovered his passion for 3D while studying his Bachelor’s degree in Architecture.
Farid has worked with brands like Nike, Levis, Etnia Barcelona, Apple, Crocs, Clergerie, and Glide. He has also won numerous awards for his work, including the 3DTotal Excellence award, CGPlus Editor's Pick, and Hum3D 2016 Challenge Team Choice Award.
- 95% positive reviews (160)
- 5,139 students
- 24 lessons (4h 40m)
- 16 additional resources (1 files)
- Online and at your own pace
- Available on the app
- Audio: English, Spanish (Latam), French, Italian, Portuguese, Turkish
- Spanish · English · Portuguese · German · French · Italian · Polish · Dutch · Turkish · Romanian · Indonesian
- Level: Beginner
- Unlimited access forever
Recommended software & tools for this course
Category
Areas