

Anatomical Drawing Tutorial: the human figure step by step
Learn to create expressive drawings of human anatomy by exploring abstraction and movement
Anatomical painting is one of the most complex exercises for any artist or drawing lover, therefore, learning to analyze the key points of the human figure to transport them to paper is the basis of any work.
Pau Marinello (@marinello) is a contemporary visual artist whose works have toured the globe through various exhibitions in Spain, England, Austria and Lebanon. Specialized in contemporary painting, Pau captures the movement of the human figure to achieve an expressiveness that reimagines reality.
Learn with him how to draw human anatomy from scratch and manage to master movement and gestures in this anatomical drawing tutorial.
Follow, step by step, the entire process in the following video!
Materials necessary to draw the human figure
In order to follow this tutorial and create your own drawing, you need these materials:
- Reference image: can be digital or printed.
- Analog or digital pencil: depending on the reference image.
- Paper: we recommend that it be grainy and weigh more than 140 gr/m².
- Vinyl charcoal.
- White pencil.
- Eraser.

How to draw the human figure step by step
Below, visual artist Pau Marinello details the entire process to draw expressive human bodies. Get inspired and draw the human figure in motion!
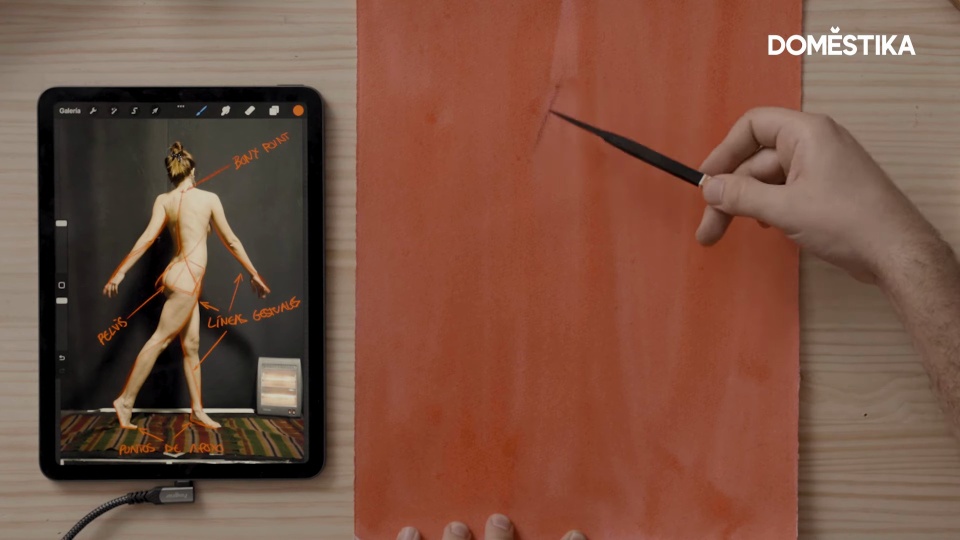
1. The study of the reference image
We begin by marking the main lines of gesture, this allows us to capture the different movements of the body. First we are going to locate the seventh vertebra in the reference image and from that point, we make a straight line that marks the direction of the spinal column.
Next, simplify the hip by drawing a rectangle and connect the spine line with the supporting leg. This gesture is the basis of the drawing and to complete it, we add lines that mark the rest of the structure, such as the other leg and both arms. You can add more gestural lines, but these are essential and help us simplify.

2. From reference to paper
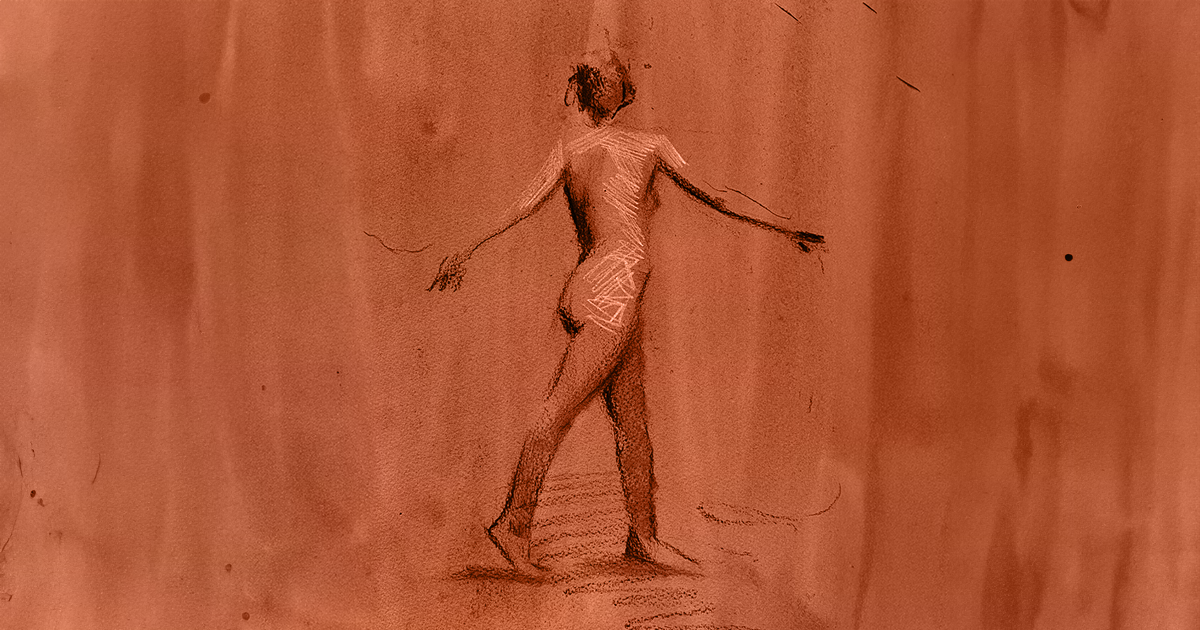
With charcoal, reproduces the gestural lines of the reference image on the paper. Start by marking the seventh vertebra, from there we draw the line of the spine and the line that represents the supporting leg. This exercise focuses on working on gestural lines, don't worry if the proportions are not perfect because now it is not the most important thing.

3. Represent volumes
If you need to draw the volumes to get a clearer base, you just have to make a square that marks the rib cage. You can also indicate the direction of the head to outline the movement of the figure. This part may be somewhat abstract, but at this moment the important thing is to achieve the greatest possible fluidity in all the lines.

4. Shadows and lights
With the main lines of the gesture defined, apply chiaroscuro to the entire drawing. Do it with different spots in the areas that define the movement of the body. It's about playing and enjoying the process, don't focus on the proportions and experiment with charcoal and white pencil until you achieve the degree of definition that you like the most.

This tutorial is just a glimpse of everything you can learn with Pau Marinello about anatomical drawing in his online course; Contemporary drawing of the human figure: expression and movement.
If you also want to continue improving your drawing skills, take advantage of this Pack of the 3 best illustration courses .
To learn more about drawing:
- Anatomical drawing for beginners, a course by ZURSOIF Miguel Bustos Gómez.
- Gesture drawing exercises: how to draw expressive poses.
- Illustration Exercises: paint in a few minutes, learn to optimize your drawings and get the most out of them.
- Character drawing from scratch: portraying faces and figures, a course by Laura Pérez.


0 comments