


How to paint realistic eyes
Are you getting started with digital art? Are you a pro revisiting the basics? Does your latest portrait have two empty eye sockets in desperate need of filling?
Regardless of your current situation and level of expertise, in this easy to follow step by step tutorial you will find a trusty guide to kickstart your creative journey or finally jump the hurdle you might be stuck on.

Eye Shape
We start with a circle. This will represent the eyeball. Inside it we add a smaller circle for the iris, and then an even smaller one for the pupil. We will build upon this foundation.
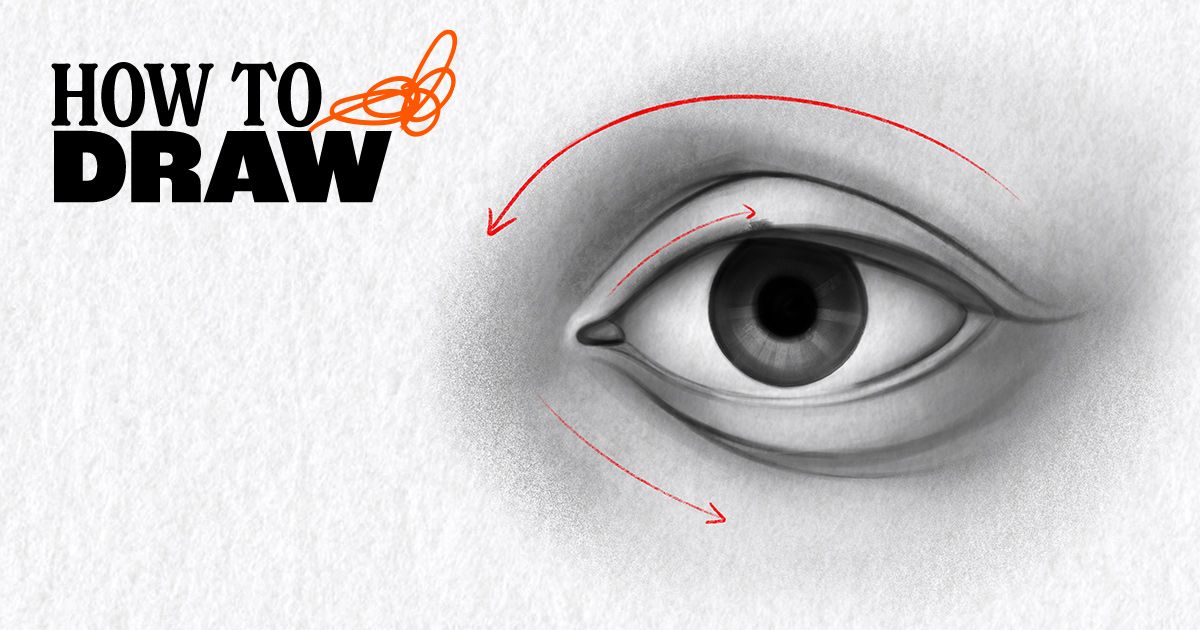
Adding our next layer we will draw a curving line for the upper eyelid and a slightly flatter one for the lower eyelid.
Notice how the tear duct extends outside the circle in the image below.

Adding Depth
Then it's time to double those lines. With this step we are suggesting the thickness of the eyelids as you can see being done in the image below.

Refining Eyelids
Now let's draw a few curved lines above and below our initial eye shape. Look at your own eyes, if you dare, or look up some pictures for reference. Take notice of how the skin folds and droops over the eyeball. Some wrinkles will help us get closer to the detailed look we are after but too many wrinkles... Nobody wants that!

A Basic Outline
In this step we will refine the linework and hide all previous layers. Finishing our basic sketch with a bit of color on the iris.

Beyond a Sketch
Underneath your basic sketch create another layer to add the base color of your painting. Then shadow the sclera or as it's commonly referred to "the white of the eye". Since the eyeball is round, the center of the eye should be the lightest part.

Detailing The Iris
We will make the top part of the iris darker since the upper eyelid casts a shadow on it. Then add some fine radial highlights.

Shadows and highlights
On a new layer airbrush the shadows using a darker tone. Accentuate the natural curves of the eye and surroundings. Finally add the highlights you see fit on the eyeball and don't forget about the waterline and tear duct.

Eyelashes
We are not done just yet, of course! Where are "the lashes"? Illustrators often struggle when it comes to drawing lashes. Here are some useful tips to follow:
Start with different sets of lash clusters. The key here is that the lashes should converge at the end, as demonstrated in the example below.
A directionless set of eyelashes won't do it. Visualize them emerging from the center of the eye in a straight line that gently fans outwards... Yes... This is indeed a tricky part...!

This is it for now! But, luckily for you, down below you will find a document explaining the steps we just went through in more detail.
Happy painting!

Join for Free and download
Domestika - How to paint realistic eyes.pdf
And here are some eye-catching links you might want to check out with your brand-new pair of eyes:
- Join our drawing courses
- How to Draw a Corgi Step-by-step, an article by Cristina Gómez
- How to Draw a Realistic Cat Step-by-step
Tutorial & Illustrations by @alinacuiedan


0 comments