


Embroidery Tutorial: How to Make A Floral Embellishment
Discover advanced ways to make 3D floral embellishments using sequins and beads in this free step-by-step tutorial
Embroidering floral embellishments is a great way to personalize your clothes and accessories. You can add them to just about anything—suits, dresses, bags—or give them away as a one-of-a-kind handmade gift!
Jodie Ruffle (@jodieruffle) is an embroidery and embellishment designer for the fashion industry, who's worked with brands including Alexander McQueen, Ashish, &Daughter, and Kurt Geiger. She also collaborates with the likes of embroidery designer Ellie Mac and textile company DMC. In her personal work, Jodie focuses on deconstructing traditional haute couture embroidery and embellishment techniques using sequins and beads for upcycled garments.
In this embroidery tutorial, Jodie teaches you how to make your own intricate floral 3D embellishments—from the threading to creating unique patterns, and adding final touches. Follow along with the video below and read on for more details.

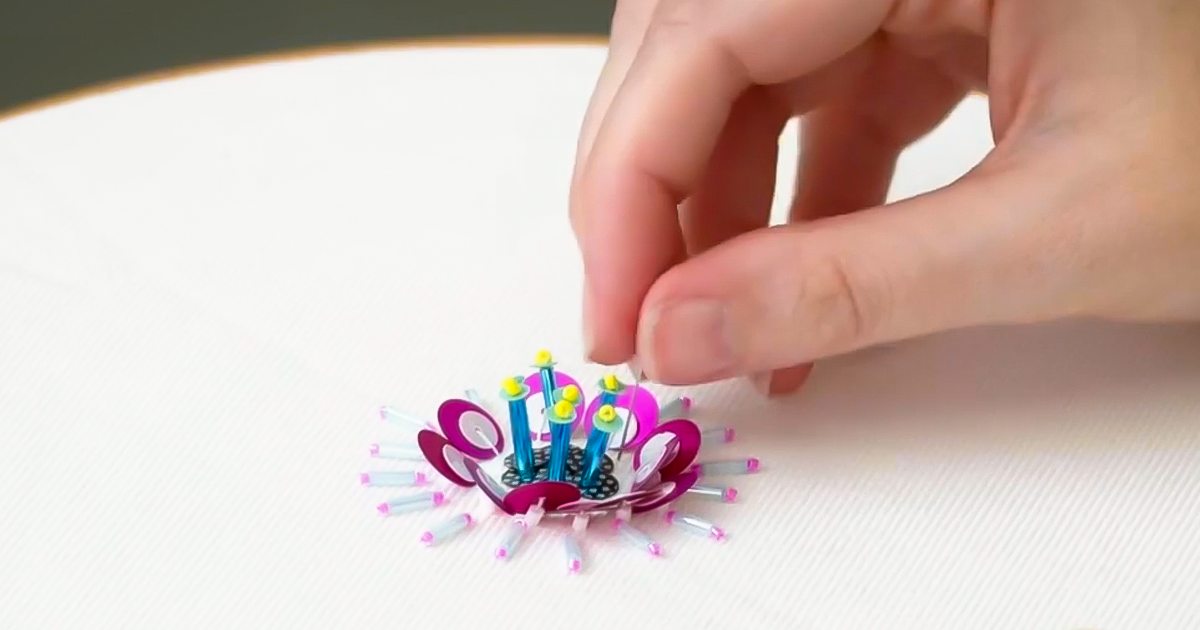
1. Starting your embellishment
Prepare your thread. Don’t forget to tie a small knot at the end of the thread so it doesn’t pull through your embroidery hoop. Pull the thread through the center of your hoop, and begin designing!
Consider how you want your embellishment to look, adding sequins and bugle beads to achieve your desired 3D look.

Continue to embroider the center of your flower using the same pattern of sequins and beads, until the center of your embellishment is a size you are happy with.
2. Building the center of the flower
Bugle beads don’t always need to stand on their ends. They can also lay flat against the embroidery hoop, adding more dimension and color to your embellishment.

Don’t worry about being super precise, especially if you are making a flower—consider the beautiful imperfections of nature that give everything its true beauty.
Pro tip: use a piece of felt to put your sequins and beads on while you are embroidering. This will help prevent all of the elements from sliding all over your table while you work.

3. Developing the 3D design
Continue to add to your embellishment. Consider the different sizes, shapes, and colors of the sequins you have, and get creative with how you mix and match them. Let your imagination run wild as you continue to build up your 3D design!

As the design gets more full, you may find that you need to move things out of the way, or your needle will get caught on some thread. Be patient and move the elements out of the way as needed.
4. Finalizing the embellishment
To finish the embellishment, simply tie off the thread on the back of the embroidery hoop, and you’re done!

Did you enjoy this tutorial? If you’d like to learn more about drawing unique digital paintings, check out Jodie Ruffle’s online course Fashion Embroidery: Embellishing With Beads.
Learn more about embroidery
1. Discover 15 online creative embroidery courses to help you get started.
2. Learn how to embroider a patch by hand in this free step-by-step tutorial.
3. Get inspired by ten great embroidery artists to follow on Instagram—from creatives pushing the boundaries to haute couture fashion houses.


0 comments