Basic Techniques for Embroidering Letters
A course by Juliana Mota Giopato , Embroiderer, Designer, and Teacher

Joined July 2020


Create an embroidered composition combining letters, shapes, colors, and textures
Joined July 2020
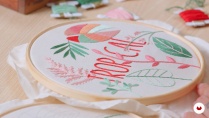
Embroidering letters and written elements in your creations is a great way of giving a unique touch to your composition and discovering infinite possibilities to express your ideas with threads. Brazilian embroiderer and designer Juliana Mota is an expert in the craft and in this course, she teaches you how to give shape to your words using thread.
Learn how to make creative embroidered pieces from the design to the final touches. Using nature as inspiration, Juliana teaches you different techniques and stitches to create a unique decorative piece by combining letters and drawings.
What will you learn in this online course?
17 lessons & 16 downloads


- 99% positive reviews (455)
- 8,819 students
- 17 lessons (2h 43m)
- 16 additional resources (7 files)
- Online and at your own pace
- Available on the app
- Audio: Portuguese, English, Spanish (Latam), French, Italian, Turkish
- Spanish · English · Portuguese · German · French · Italian · Polish · Dutch · Turkish · Romanian · Indonesian
- Level: Beginner
- Unlimited access forever
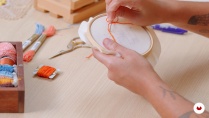
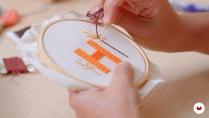
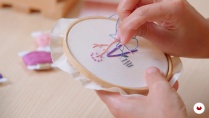
What is this course's project?
Create an embroidered composition by combining letters and drawings inspired by nature. The piece will be framed and ready to be used as a decorative object.

Projects by course students


Who is this online course for?
For all those who want to develop their creativity and express themselves through embroidery.
Requirements and materials
No previous experience is required to take this course.
As for materials, you’ll need pencils, paper, an eraser, printed images to cut out, different colored hanks of embroidery thread, sewing needles (numbers 5, 6, 7, 8, and 9), flat fabrics (raw cotton, twill, linen, denim), an embroidery hoop, and adhesive glue.

Reviews

Juliana Mota Giopato
A course by Juliana Mota Giopato
Juliana Mota is a Brazilian designer and embroiderer from São Paulo. She studied graphic design and has collaborated in this field with editors, agencies, and photography studios. As a freelance illustrator she has done work for magazines, books, films, and websites.
In 2014, she began to embroider and teach courses and workshops on the subject. She currently works as a trademark embroidery artist, custom embroiderer, illustrator, and teacher.
Content
-
U1
Introduction
-
Presentation
-
Influences
-
What Will We Learn in the Course?
-
-
U2
Materials and stitches
-
Materials
-
Back stitch, brick, full, straight and Pekingese 1
-
Back stitch, brick, full, straight and Pekingese 2
-
Stem Stitch, Daisy, Loom and French Knot 1
-
Stem Stitch, Daisy, Loom and French Knot 2
-
Little chain, leaf point and lollipop
-
-
U3
Design creation
-
Manual gluing
-
Color theory
-
Choosing colors and where to start embroidering
-
-
U4
Time to embroider
-
Defining the stitches according to each shape
-
Applying the outline stitches - stem, back and lollipop 1
-
Apply the Outline Stitches - Stem, Back and Lollipop 2
-
Applying the filling stitches - Stem, Full and Loom
-
Finishing the back of the hoop
-
-
FP
Final project
-
Basic techniques for letter embroidery
-
What to expect from a Domestika course
-
Learn at your own pace
Enjoy learning from home without a set schedule and with an easy-to-follow method. You set your own pace.
-
Learn from the best professionals
Learn valuable methods and techniques explained by top experts in the creative sector.
-
Meet expert teachers
Each expert teaches what they do best, with clear guidelines, true passion, and professional insight in every lesson.
-
Certificates
PlusIf you're a Plus member, get a custom certificate signed by your teacher for every course. Share it on your portfolio, social media, or wherever you like.
-
Get front-row seats
Videos of the highest quality, so you don't miss a single detail. With unlimited access, you can watch them as many times as you need to perfect your technique.
-
Share knowledge and ideas
Ask questions, request feedback, or offer solutions. Share your learning experience with other students in the community who are as passionate about creativity as you are.
-
Connect with a global creative community
The community is home to millions of people from around the world who are curious and passionate about exploring and expressing their creativity.
-
Watch professionally produced courses
Domestika curates its teacher roster and produces every course in-house to ensure a high-quality online learning experience.
FAQs
What are Domestika's online courses?
Domestika courses are online classes that allow you to learn new skills and create incredible projects. All our courses include the opportunity to share your work with other students and/or teachers, creating an active learning community. We offer different formats:
Original Courses: Complete classes that combine videos, texts, and educational materials to complete a specific project from start to finish.
Basics Courses: Specialized training where you master specific software tools step by step.
Specialization Courses: Learning paths with various expert teachers on the same topic, perfect for becoming a specialist by learning from different approaches.
Guided Courses: Practical experiences ideal for directly acquiring specific skills.
Intensive Courses (Deep Dives): New creative processes based on artificial intelligence tools in an accessible format for in-depth and dynamic understanding.
When do the courses start and when do they finish?
All courses are 100% online, so once they're published, courses start and finish whenever you want. You set the pace of the class. You can go back to review what interests you most and skip what you already know, ask questions, answer questions, share your projects, and more.
What do Domestika's courses include?
The courses are divided into different units. Each one includes lessons, informational text, tasks, and practice exercises to help you carry out your project step by step, with additional complementary resources and downloads. You'll also have access to an exclusive forum where you can interact with the teacher and with other students, as well as share your work and your course project, creating a community around the course.
Have you been given a course?
You can redeem the course you received by accessing the redeeming page and entering your gift code.


J'ai beaucoup apprécié le cours de cette brodeuse.
merci
O curso Técnicas básicas para bordado de letras da Juliana Mota apresenta um conteúdo claro e bem estruturado, ideal tanto para iniciantes quanto para quem deseja aprimorar suas habilidades no bordado. As explicações são didáticas, com demonstrações passo a passo que facilitam a compreensão das técnicas ensinadas.
As aulas são muito bem explicadas pela professora, as técnicas são passadas passo a passo tornando o processo do bordado simples, estou amando as aulas, a professora transmite muita calma, aprendi pontos de bordado que não conhecia, muito obrigada!
Gostei muito do curso, vale super a pena.,
Juliana es una maestra estupenda. Es sencillo seguir sus explicaciones y llevar a cabo las prácticas. Me encanta este curso! :-)