Dynamic Animation with 2D and 3D Illustration
A course by Advntr Studio , Animation Studio


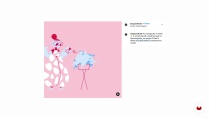
Learn to create original animations by combining different formats of digital illustration
Digital illustration allows you to express your inner artistic world. Combining illustration with animation, allows you to bring that world to life! Willie and Jill from Advntr Studio are here to teach you how to do just that by creating engaging animations.
Uncover the secrets behind animation and learn how to use editing software to tell your own unique story. Get a complete step-by-step walkthrough from creating your illustration on paper to digitizing and animating it in software like After Effects, Cinema 4D and Octane Render.
What will you learn in this online course?
39 lessons & 12 downloads


- 100% positive reviews (116)
- 3,893 students
- 39 lessons (9h 30m)
- 12 additional resources (3 files)
- Online and at your own pace
- Available on the app
- Audio: English, Spanish (Latam), French, Indonesian, Italian, Portuguese, Romanian, Turkish
- Spanish · English · Portuguese · German · French · Italian · Polish · Dutch · Turkish · Romanian · Indonesian
- Level: Beginner
- Unlimited access forever
Recommended software & tools for this course
What is this course's project?
Create an original 20-second animation that tells a story using editing software.

Projects by course students


Who is this online course for?
The course is great for designers and animators, or anyone who wants to learn animation techniques.
Requirements and materials
Basic knowledge of Photoshop and After Effects is recommended. Knowledge in Cinema 4D is helpful but not necessary since your teachers give you an in-depth run through of the software.
To take this course, you need access to a computer with Photoshop, After Effects, Cinema 4D, and Octane Render, or similar software.

New to Adobe After Effects? In that case, we recommend taking Domestika Basics courses to learn how to use the software: Introduction to After Effects.
Reviews

Advntr Studio
A course by Advntr Studio
After graduating from Parsons School of Design in New York City, Willie and Jill Russell started working freelance in their respective disciplines. Willie worked with motion and production studios, and Jill with marketing agencies. After collaborating on various projects, clients began requesting the married duo as a team. Thus, in 2014, Brooklyn-based Advntr Studio was born.
Willie has worked with renowned animation studios like Buck, Imaginary Forces, Perception, Ready Set Rocket, First Born, and more. Jill has freelanced for agencies such as AKQA, Havas Worldwide, HUGE, Method, and Loyal Kaspar. Together, they've collaborated for brands like Google, Dell, JP Morgan, Verizon, and Marvel Studios.
Content
-
U1
Introduction
-
About Us
-
Influences
-
-
U2
Inspiration, Concepting and Storyboarding
-
Inspiration for a Story
-
Writing the Visual Script
-
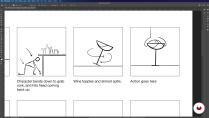
Starting Storyboarding
-
-
U3
2D Design
-
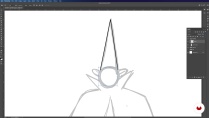
Designing Your Protagonist
-
Refining Your Sketch in Photoshop 1
-
Refining Your Sketch in Photoshop 2
-
Refining Your Sketch in Photoshop 3
-
Designing Styleframes
-
Deciding Between 2D and 3D
-
-
U4
3D Design
-
Model Tabletop Items Using Box-Modeling 1
-
Model Tabletop Items Using Box-Modeling 2
-
Model Tabletop Items Using Box-Modeling 3
-
Modelling the Character's Face and Skull 1
-
Modelling the Character's Face and Skull 2
-
-
U5
3D Animation
-
Figuring Out Pacing: Making Your Animatic
-
3D Animation: Begin Animating in Cinema 4D 1
-
3D Animation: Begin Animating in Cinema 4D 2
-
3D Animation: Pose Morph Tag 1
-
3D Animation: Pose Morph Tag 2
-
3D Animation: Physics Simulation
-
-
U6
2D Animation
-
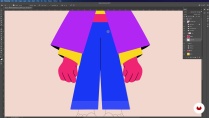
Starting 2D Animation: Building Your Character in After Effects 1
-
Starting 2D Animation: Building Your Character in After Effects 2
-
Starting 2D Animation: Building Your Character in After Effects 3
-
Starting 2D Animation: Animating Your Character 1
-
Starting 2D Animation: Animating Your Character 2
-
Starting 2D Animation: Animating Your Character 3
-
Starting 2D Animation: Animating Your Character 4
-
Starting 2D Animation: Animating Your Character 5
-
Starting 2D Animation: Animating Your Character 6
-
Starting 2D Animation: Animating Your Character 7
-
Finishing Your 2D Animation: Animating Flourishes 1
-
Finishing Your 2D Animation: Animating Flourishes 2
-
-
U7
Lighting, Texturing and Rendering
-
Texturing Our 3D Scenes 1
-
Texturing Our 3D Scenes 2
-
Lighting Our 3D Scenes
-
Rendering and Compositing
-
The Importance of Social Media and Your Career
-
-
FP
Final project
-
Dynamic Animation with 2D and 3D Illustration
-
What to expect from a Domestika course
-
Learn at your own pace
Enjoy learning from home without a set schedule and with an easy-to-follow method. You set your own pace.
-
Learn from the best professionals
Learn valuable methods and techniques explained by top experts in the creative sector.
-
Meet expert teachers
Each expert teaches what they do best, with clear guidelines, true passion, and professional insight in every lesson.
-
Certificates
PlusIf you're a Plus member, get a custom certificate signed by your teacher for every course. Share it on your portfolio, social media, or wherever you like.
-
Get front-row seats
Videos of the highest quality, so you don't miss a single detail. With unlimited access, you can watch them as many times as you need to perfect your technique.
-
Share knowledge and ideas
Ask questions, request feedback, or offer solutions. Share your learning experience with other students in the community who are as passionate about creativity as you are.
-
Connect with a global creative community
The community is home to millions of people from around the world who are curious and passionate about exploring and expressing their creativity.
-
Watch professionally produced courses
Domestika curates its teacher roster and produces every course in-house to ensure a high-quality online learning experience.
FAQs
Domestika courses are online classes that allow you to learn new skills and create incredible projects. All our courses include the opportunity to share your work with other students and/or teachers, creating an active learning community. We offer different formats:
Original Courses: Complete classes that combine videos, texts, and educational materials to complete a specific project from start to finish.
Basics Courses: Specialized training where you master specific software tools step by step.
Specialization Courses: Learning paths with various expert teachers on the same topic, perfect for becoming a specialist by learning from different approaches.
Guided Courses: Practical experiences ideal for directly acquiring specific skills.
Intensive Courses (Deep Dives): New creative processes based on artificial intelligence tools in an accessible format for in-depth and dynamic understanding.
All courses are 100% online, so once they're published, courses start and finish whenever you want. You set the pace of the class. You can go back to review what interests you most and skip what you already know, ask questions, answer questions, share your projects, and more.
The courses are divided into different units. Each one includes lessons, informational text, tasks, and practice exercises to help you carry out your project step by step, with additional complementary resources and downloads. You'll also have access to an exclusive forum where you can interact with the teacher and with other students, as well as share your work and your course project, creating a community around the course.
You can redeem the course you received by accessing the redeeming page and entering your gift code.

Good course and it is aimed at beginners
Curso perfeito para organizar o processo de criação e execução de uma animação curtinha, Ótima pra Reels de Motion
An excellent course because it combines the two most famous and luxurious programs in the field of motion graphics and the world of dimensional 3D. The explanation was clear. Honestly, I benefited a lot from this course.
I have always wanted to learn how to combine 2D and 3D elements in motion graphics, and I found this course and I love it.
I really feel like this course is completing what was missing in my solo learning journey trying to learn how to combine 3D and 2D i am enjoying it so far !