


Downloadable tutorial: How to Draw a Corgi Step by Step
Learn how to draw an adorable Corgi with our fun and easy drawing tutorial. Follow simple steps to create your own Corgi masterpiece using basic shapes.
Corgi dogs are beloved for their adorable short legs and expressive faces, making them a perfect subject for an easy but satisfying drawing session. In this tutorial, we will explore simple drawing techniques that utilize basic shapes to help you create your very own Corgi. So grab your tools, and let's get started!
Corgi drawing video tutorial

Step 1: Draw the Body
Begin by drawing a large egg like shape for the Corgi's body. This oval will serve as the main
framework for your drawing.

Step 2: Add the Head
Above one end of the oval, draw a smaller circle for the dog’s head.

Step 3: Position the Feet
Start by drawing a vertical line down the center of the oval, all the way down to where the feet
should be.Corgis have short, stubby legs, so make sure the line is not too long. Then, draw two horizontal lines across the bottom of the oval, intersecting with the vertical line. These lines will help us position the Corgi's feet. The horizontal lines represent the ground or floor level for both pairs of feet, the ones closer to us and those behind them, as indicated by the red lines.
Now, let's position the paws. Along those lines, add four ovals, ensuring they don't lay flat on the guideline. Instead, have them touch it with the widest part of the oval since Corgi paws are naturally round, and we want to depict that curvature.

Step 4: Adding Volume
To give the Corgi body more volume, connect the head to the body with a neck using two lines. Ensure that the lines curve naturally as they meet the body, following a smooth and flowing transition. For the legs, aim to achieve that adorable chubby Corgi look by using curved lines.
Instead of straight lines, use gentle curves to outline the legs, begin from the paws and gradually widen the legs as you move upward. Imagine a ball at the widest point of the leg to guide you in creating a smooth, natural contour.
The paws don't need to be complete ovals at this stage; you can emphasize only a portion of
them, allowing the line to break within the interior of the foot.

Step 5: The Face
The face is the most important and expressive part of our Corgi drawing. Begin by dividing the circle (the head) with a cross, which will guide the proportional placement of the features. At the center of the cross, add the nose. Just above the nose, along the horizontal line of the cross, position the eye line. Using the nose as the center point, place the mouth, then add the tongue. Finally, position the ears on either side of the head.

Step 6: Expression
Time to put some life in our drawing. Begin by softening the eyes. Place a line that crosses over the eye circle in the outer corner. This will create a natural, gentle expression. Add two small dots in the inner part of the eye for added detail.Next, incorporate the markings of the Corgi.
These dogs typically have a white stripe that starts at the head and runs down to their belly. Start at the forehead and gently curve this marking over the smile of your Corgi's face.To connect the ears with the head seamlessly, imagine that you're fusing the two shapes.
Draw a line that drapes over the head, integrating the ears into the overall structure. Ensure that you incorporate the facial markings within this step, making sure they flow naturally with the contours of the face and head.

Step 7: Adding Fur
In this crucial step, focus on adding a flowing texture of lines that suggest fur, keeping in mind the underlying structure you've created so far. The white stripe we mentioned earlier will play a role in adding dimension to the body. Here's how to proceed:
1. Trust the construction you've established and begin by adding lines that flow naturally with the form. These lines should suggest the texture of the Corgi's fur. Be patient and take your time, as this step will bring your drawing to life.
2. Remember the white stripe we mentioned earlier. To add dimension to the body, especially since the head is turned, start a curved line, resembling an "S" shape, from the side of the head. Let this line flow down the body, all the way to the paw, as indicated by the red line. Keep in mind for later that the paws are also white.
3. Along this white stripe, break the line occasionally to emphasize the texture and thickness of the fur. These breaks will give your Corgi drawing a more realistic and tactile appearance.
By following these guidelines and adding fur texture that aligns with the contours of the body, you'll bring depth and realism to your Corgi illustration. Remember to be patient and attentive to the shape underneath as you add the fur, and that sometimes less is more, meaning you don’t have to break the line and add details everywhere, rather, choose a just few “fluffy” areas.

Step 8: The Shading
Our final step is shading.
Begin by shading the entire body of the Corgi, except for that distinctive white stripe, and it’s
paws. If you're working digitally, consider selecting the area and adding color, followed by a
subtle texture preferably on a different layer, so that you can adjust the opacity or try different
brushes. If you are using traditional mediums, be careful to start your shading very lightly, use a
lighter pencil first and then select a darker one for the final touches.
You must layer your shading, so start light, it’s harder to correct or go back when working traditionally.
Regardless of your chosen medium, pay special attention to the shading. Darken the lower part
of the Corgi's body, especially around its legs and belly. Gradually lighten your shading as you
move upwards.
This technique imparts dimension and volume to your drawing. As a finishing touch, create a shadow beneath the Corgi, grounding it in the scene and contributing to a more realistic appearance.

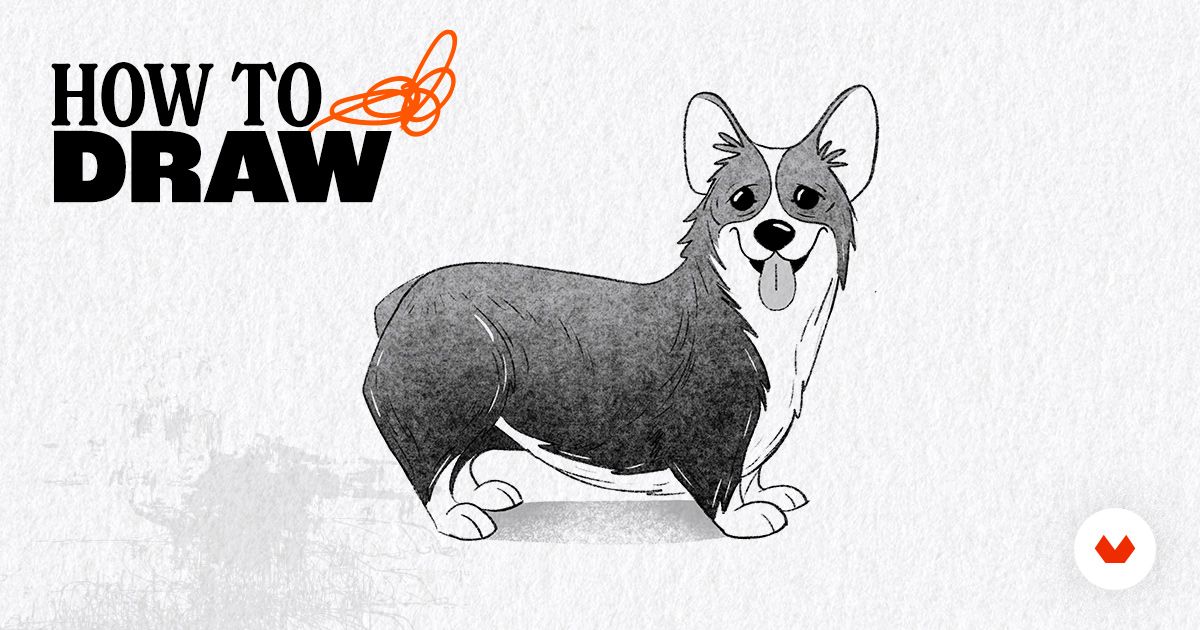
Your end result should look like this:

If you'd like to explore a comprehensive, step-by-step tutorial, you can download it right here:
Join for Free and download
How to draw a corgi.zip
And voilà! Your Corgi drawing is complete. I hope you take pride in your artistic achievement. Remember, it's absolutely okay to need a few tries to get things just the way you like them. Be patient with yourself, but always make sure to have fun throughout the creative process.
You may also like to explore these links:
- Join our drawing classes
- Easy drawing ideas for beginners
- Tutorials: How to draw a body


0 comments